Antique Lilac
  • Home
  • for Sale
  • Galleries
  • Favourite Photos
  • Tutorials
  • Blog
  • Links
  • Books

Lace Angel Wings

1/22/2015

5 Comments

 
I was asked how I made the wings for my angel ensemble, so thought I'd share a few pictures, and try explain the process. Like everything with this outfit, nothing ever went as I expected, and the wings were no exception. I originally drafted a pattern for an angle wing. I wasn't sure how I was going to make it. Then I came across some lace appliqués, that in my opinion, resembled feathers
Picture
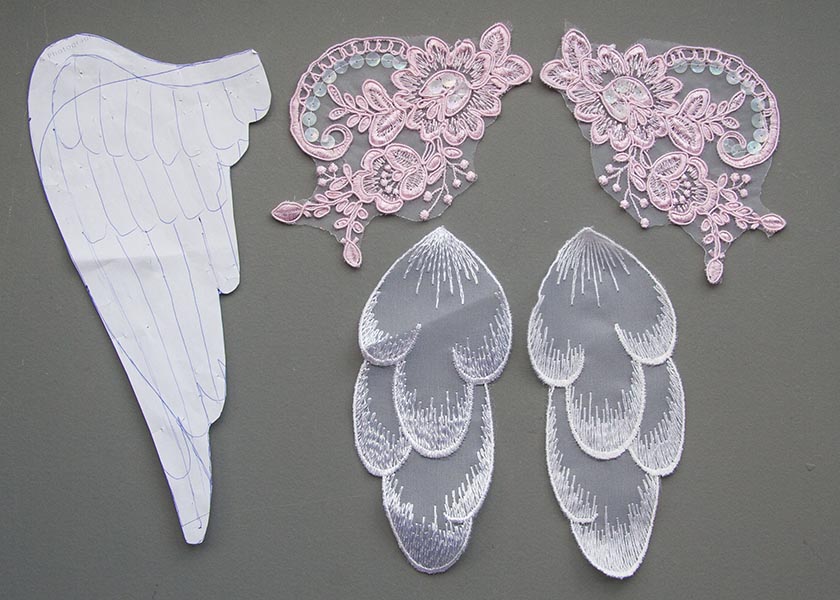
There were actually two different versions of the 'feathered' appliqués, and I was originally going to use the second shorter ones for the top half of the wing. But then, when I was going through my lace stash again, I came across the folder full of the pink floral appliqués, and it was like they were just 'calling out to be used'. So I did. 

The only way to show the lace to maximum advantage was to layer it between some very sheer white fabric. The sheer was too slippery to just cut out, or to pre-draw the wing shape onto, so I pinned two layers of the sheer onto the paper pattern, placed the lace appliqués on top, pinned them down, and stitched around the outside edge of both the paper pattern and the lace appliqués, leaving an opening at the shoulder so I could turn the wings right side out.  After stitching, cutting out the wings, clipping the edges, and turning them right-side-out, I pressed them, then top-stitched a narrow pocket along the top edge for the wire, and top-stitched the wing to accent the embroidered appliqués inside.

I bent wire to fit into the pockets on the edge of the wings, inserted them, hot-glued the ends in place. The wire was visible through the sheer fabric, so I covered the edge with glitter to hide it. While I was at it, I also added a bit of glitter to highlight the pink floral design of the lace.  I used pink glitter fabric paint, sprinkled with iridescent glitter to tone it down....
Picture
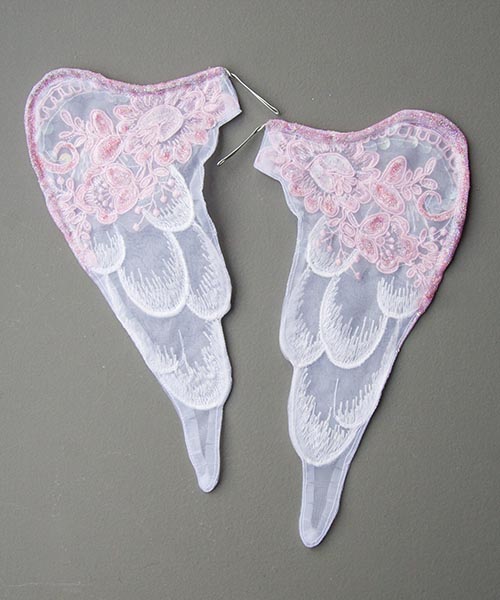
The wires of the wings slip into narrow pockets sewn onto the back of the dress bodice.  
So there you are. They were actually quite easy to do once I knew what I was doing.  The 
biggest challenge to making similar wings would be finding similar shaped lace appliqués.
5 Comments
Lorraine
1/22/2015 09:47:40 am

Thanks so much for doing this, Martha. I can follow it just fine--up to the point where you turn the wings right-side out. Is this where you remove the paper? And do you end up with a layer of sheer fabric over the appliques? It sounds like you layered the appliques over both layers of sheer. I guess I'm confused.

I've never seen lace appliques that looked like that, so I imagine finding them again would be near impossible. It's a good thing you had two. If it were me I'd have bought only one and then I'd be trying to figure out how to cut it in half to make a pair!

Brava! Great job!

Reply
Martha
1/22/2015 08:23:12 pm

In order for the appliqués to be inside the wing when it's turned right side out, they need to be on top of both layers of sheer fabrics. Actually, the appliqués were basted onto sheer fabric first, and then they became the Back side of that piece of sheer fabric. When sewing anything the RIGHT sides need to be together, and that would be the sheer fabrics. After sewing around the outside of the wing, the paper pattern is unpinned and removed. After trimming and clipping, the wing gets turned right side out - the 'wing' gets opened between the two layers of sheer and turned right side out so the appliqués are inside.

Reply
Lorraine
1/23/2015 03:02:58 am

Many thanks for the clarification. I'm about to start work on a costume that should have wings. I was planning to omit them because I had no idea how to proceed, but now I think I'll go shopping for some lace.

Martha
1/23/2015 04:05:47 am

I also have several other wing tutorials, with detailed step-by step instructions that might be of some help. You'd just have to use different fabrics than the tutorials, start by placing a layer of STIFF sheer fabric over your paper pattern, layering the lace over it until you are happy with it, then basting it into place. Just remember that the lace is on the WRONG side when you put the two layers of fabric right sides together to sew your wings.

Catherine Lewis
1/22/2015 11:11:46 pm

I also say thank you Martha, very exquisite work, you are indeed lucky to have had '2' as Lorraine pointed out, your work is magnificant. I am surprised you did not have to 'stiffen' the wings. That is the only thing I have done with mine but yours seem to be complete without stiffening them, bravo! You are a great Mentor and we all love you. Thank you so much for sharing this. Katee

Reply


Leave a Reply.

    Author

    Martha Boers is an award-winning Canadian doll maker and costumer specializing in fantasy and historical-style costumes.
    Read More... 

    Archives

    March 2023
    February 2023
    January 2023
    December 2022
    November 2022
    October 2022
    September 2022
    August 2022
    July 2022
    June 2022
    May 2022
    April 2022
    March 2022
    February 2022
    January 2022
    December 2021
    November 2021
    October 2021
    September 2021
    August 2021
    July 2021
    June 2021
    May 2021
    April 2021
    March 2021
    February 2021
    January 2021
    December 2020
    November 2020
    October 2020
    September 2020
    August 2020
    July 2020
    June 2020
    May 2020
    April 2020
    March 2020
    February 2020
    January 2020
    December 2019
    November 2019
    October 2019
    September 2019
    August 2019
    July 2019
    June 2019
    May 2019
    April 2019
    March 2019
    February 2019
    January 2019
    December 2018
    November 2018
    October 2018
    September 2018
    August 2018
    July 2018
    June 2018
    May 2018
    April 2018
    March 2018
    February 2018
    January 2018
    December 2017
    November 2017
    October 2017
    September 2017
    August 2017
    July 2017
    June 2017
    May 2017
    April 2017
    March 2017
    February 2017
    January 2017
    December 2016
    November 2016
    October 2016
    September 2016
    August 2016
    July 2016
    June 2016
    May 2016
    April 2016
    March 2016
    February 2016
    January 2016
    December 2015
    November 2015
    October 2015
    September 2015
    August 2015
    July 2015
    June 2015
    May 2015
    April 2015
    March 2015
    February 2015
    January 2015
    December 2014
    November 2014
    October 2014
    September 2014
    August 2014
    July 2014
    June 2014
    May 2014
    April 2014
    March 2014
    February 2014
    January 2014
    December 2013
    November 2013
    October 2013
    September 2013
    August 2013
    July 2013
    June 2013
    May 2013
    April 2013
    March 2013
    February 2013
    January 2013
    December 2012
    November 2012
    October 2012
    September 2012
    August 2012
    July 2012
    June 2012
    May 2012
    April 2012
    March 2012
    February 2012
    January 2012
    December 2011
    November 2011
    October 2011
    September 2011
    August 2011
    July 2011
    June 2011
    May 2011
    April 2011
    March 2011
    February 2011
    January 2011
    December 2010
    November 2010
    October 2010

    RSS Feed

Powered by Create your own unique website with customizable templates.