Antique Lilac
  • Home
  • for Sale
  • Galleries
  • Favourite Photos
  • Tutorials
  • Blog
  • Links
  • Books

Introducing Paige

2/28/2017

5 Comments

 
I went to Charie's yesterday to pick up my Paige and Izzy. They were both very cute.  I'm always surprised just how pale the Iplehouse Normal resin is when it's brand new. But it doesn't stay that way for very long, as the resin mellows into a much more yellowish tone. 

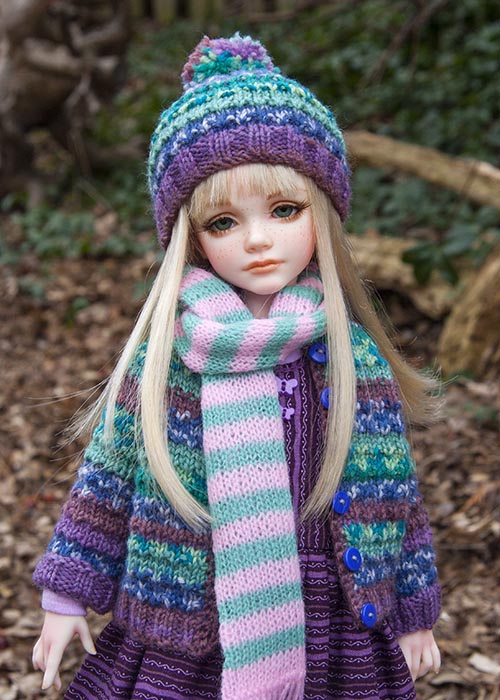
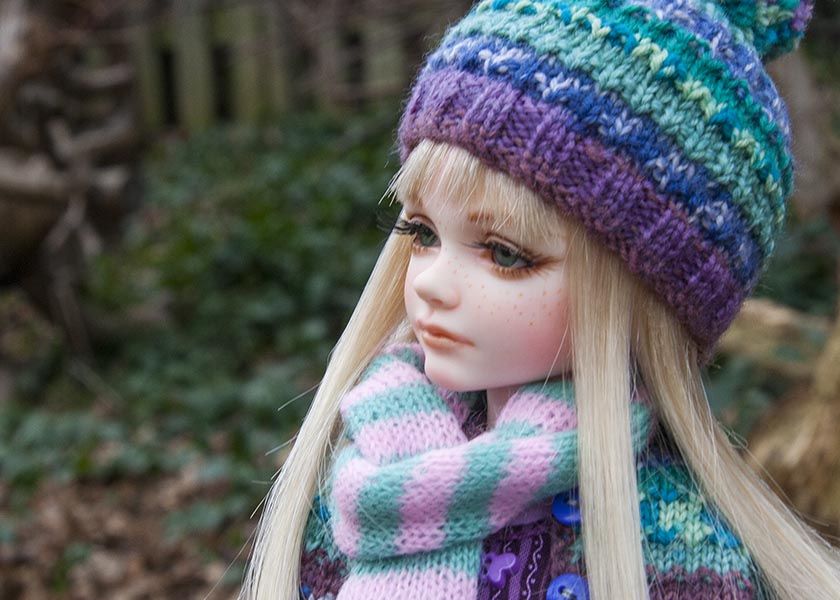
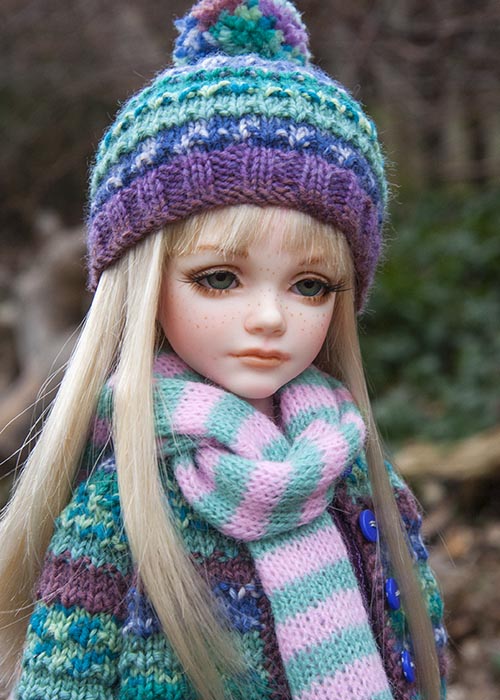
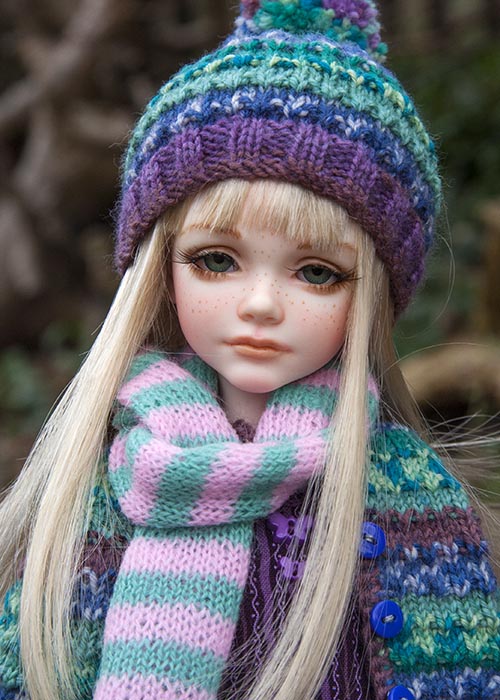
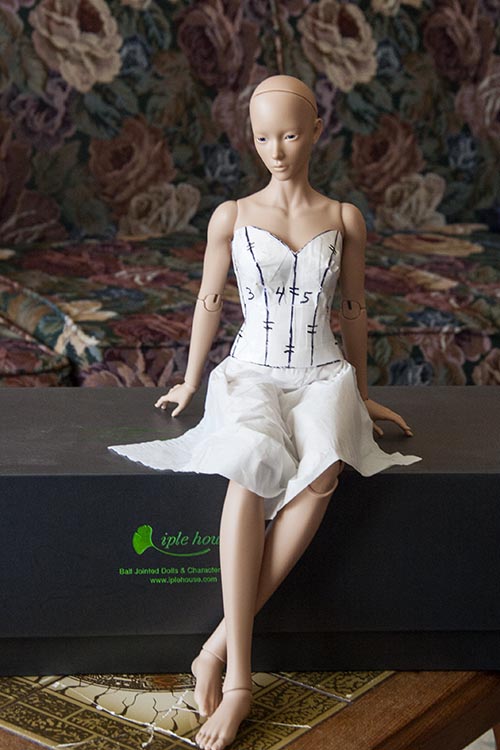
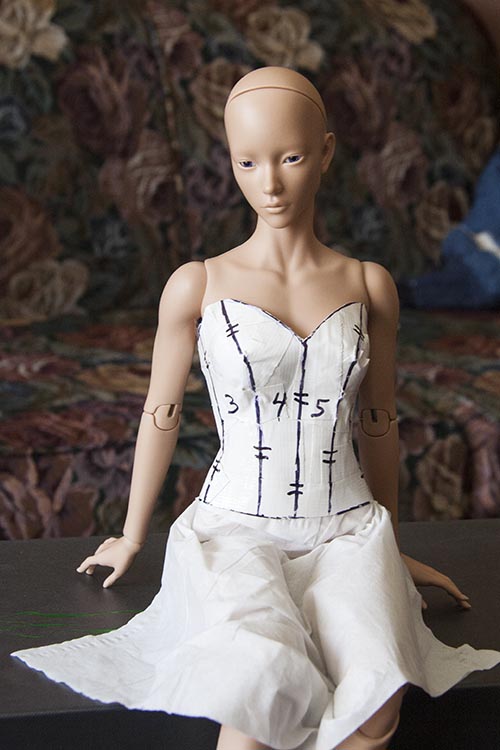
Paige has a rather 'pensive' look.  Not exactly 'sad', but like she's thinking of, or remembering something. ​Charie did a great job. Paige is definitely going to be a blonde.  I dressed her in the outfit I made for her back in January, and took her outside for her first photos....
Picture
Picture
Picture
Picture
Charie did a great job on Izzy as well. She looks adorable now.  So much better than her factory face up.  But I want to make her something special just for her, before I take any pictures of her.
5 Comments

KID Ah-ra

2/27/2017

3 Comments

 
With just one day left on Iplehouse's Discontinued Sale, I had to make my final decision on who to order. There were several dolls I was interested in, and had always thought I'd order 'some day', but it was now or never.  All February I obsessed about who - if any - I should get, as I still had quite a few new dolls from their Christmas Event who haven't even been painted yet. So I decided on the bare minimum (other than none at all) and ordered KID Ah-ra.

​I've always liked her as an Asian girl, and thought she would make a nice big sister for my Byuri...
Picture
But I'd have wanted her in Special Real Skin, so I looked at the pictures of the blank sculpt....
Picture
Which made me wonder why Byuri had to have a big sister. Why not a big brother? I have several KID girls, but just one boy, and Miles would probably like a friend. So I ordered an Ah-ra boy.
​ Think I'll call him Aaron.
3 Comments

Starting to Come Together

2/27/2017

5 Comments

 
The bodice and upper skirt layers of Miho's gown are sewn together...
Picture
I'm mostly happy with how it's coming along.  The bodice pattern will still need some additional tweaking to make it fit even better.

The band at the waist ended up a bit too bulky-looking for my taste, but there's 18 layers of fabric in there, so I guess it couldn't be avoided.  I'll need to figure out a way to embellish it to hide it....
Picture
I'm in the process of beading the edge of the overskirt..
Picture
The lace fabric for the underskirt layer won't have the nice scalloped, finished edge, as the upper lace layer, so I found some matching light green lace for that edge.
Picture
There isn't enough lace for the full length underskirt, which means fitting the lace to matching coloured tulle at the top.  And that means I need a solid turquoise underskirt so the difference between the lace and tulle layer isn't too obvious.  The waistband is already way too bulky, so I can't make an underskirt with the last skirt layers that goes up to her waist. It would look even bulkier. So I'm going to make the final three or four skirt layers fit onto their own band, which I will then hand stitch onto the bottom of the existing waistband, thus adding nothing to the fit of the bodice.  I've pleated the innermost skirt onto the second waistband....
Picture
And finally, for those who consider me a 'sewing goddess', whose work is alway perfect, here's a little reality check.  I make mistakes too.  I totally forgot to make sure the two satin border ends on the bottom edge of the top tricot overskirt, were the same width before I did the top stitching on the front. Forgot to check they were the same.  So they ended up different widths after I could no longer do anything about it.  I just hope the embellishments on the back of the gown will hide it.
Picture
5 Comments

A Hefty Flower Haul

2/25/2017

2 Comments

 
A friend told me that John Bead's Outlet store is closing it's Bridal section, and everything is 90% off until the end of the month. Which means just a few days left to go. So we went yesterday.  I was surprised just how much stock was still available, considering the sale has been on since the beginning of February. Well, I started off slow enough, but when we got to the bridal section, it was like winning the lottery!  If the price on a huge package of ribbon roses said $9.99, that meant it would cost me 99 cents.  If a package of roses said $1.00, it would cost me 10 cents!  I was like a kid in a candy store, knowing that after this place closed, there would no longer be anywhere to get these kinds of flower embellishments. The store I used to get them at on Queen Street in Toronto, closed and moved to Hamilton a while back.     So I stocked up.... and here's some of it.....
Picture
There were even a couple of ribbon rose grab bags stuffed full of dozens of bags of flowers, some with more than a hundred per package. The original price was $9.99. Which meant they cost a $1.00 now.  Here's the contents from just two bags.....
Picture
There's more flowers here than I'd ever use in a lifetime, but it's great to have them just in case.
2 Comments

Miho's Gown

2/25/2017

1 Comment

 
I started work on the bodice for Miho's gown.  I basted a layer of lace and nylon tricot onto each individual section of the bodice, then basted the sections together before machine sewing.
Picture
This gown does take that kind of meticulous attention to detail, since the doll is not very tall, so all her clothes have to look perfect in order to look convincingly in scale.

Then I started to question my fabric choices. Should I keep going with the light green bodice, or start over with lace over the mottled satin, and lace over the tricot skirts?  So I did a rough pinning of the fabrics onto the doll to get an idea of both options....
Picture
Picture
Well, I didn't care for the bodice on the right at all - it blends right into her skin colour - and it showed me that I was going in the right direction after all.  So I'm continuing with my original idea.
1 Comment

An FID Gown

2/23/2017

6 Comments

 
I finally decided what to make for my FID Miho.
I found this picture on Facebook, and Charie Wilson and I have challenged each
​other to make a version of it - or something inspired by it - for one of our dolls. 
Picture
What's especially interesting about this dress is the layers of fabric, and how there's a wide floral fabric border on the edge of the sheer overskirt. At first I thought the lace layer was on top of the sheer layer, but on closer scrutiny, it appears to be underneath. I think I've found the perfect fabrics....
Picture
The nylon tricot isn't nearly as bright a turquoise colour when it's just a single layer. The multi-coloured satin isn't 'floral' but I think it will still work. I just hope there's enough of the lace fabric. I don't think there will be enough for the full length of the underskirt, as there's no way to get more. That's what I get for always being so frugal and just buying a single metre of things I like, but haven't got a definite plan for. So I'll probably have to work out some kind of layering. Maybe with some matching tulle at the top, hidden under the overskirt.

​Anyway, I have to make the bodice first. I traced the pattern pieces onto iron-on interfacing, and ironed them onto some pale green cotton.  Next, I'm layering on the lace and then the tricot on top, and basting them into place, before finally trimming all the edges. Then I can baste the pieces together. I've also traced and cut out the bodice lining pieces, which are also ready to sew together
Picture
6 Comments

Almost Done

2/22/2017

11 Comments

 
Yesterday I spent all day working on my Wizard's beard, then trying to trim his hair to match.
​It still needs some fine-tuning, but I'm leaving it for now.
Picture
Picture
He looks pretty good, but I'm thinking he looks a bit too 'biblical', like Moses parting the Red Sea.
Picture
I figured he needed a hat to make him look more like a Wizard, so I made one this morning....
Picture
That definitely looks better. Now he's a Wizard instead of a 'prophet'.
Picture
11 Comments

Working on a Beard

2/22/2017

1 Comment

 
Yesterday I finally tackled my Wizard's beard.  I made a few lengths of wefting, so the lower
part of the beard would glue on faster. But it can only be towards the bottom of the beard, otherwise the stitching will show.  Here he is with the rows of wefting glued ​into place,
​and mohair glued onto his eyebrows. Everything will get trimmed once it's dry.
Picture
The rest if his beard had to be glued on with individual clumps of loose mohair. It's a slow, tedious process, since each layer has to dry before the next one can be added. But he's looking good....
Picture
1 Comment

Wizard Props

2/21/2017

3 Comments

 
I finished all my Wizard's props. I had already decided that he'd have a cord 'belt' as opposed to a leather one, and I made him a cloth bag for all his 'magic talisman', to hang from it. The bag has long fringes on the bottom, into which I tied even more 'magic' objects. I chose a nice letter opener sword, and it needed a scabbard, which I suspended from a leather strap tied around his waist.
Picture
Next, he needed a staff. Jan drilled a couple of small holes into the end of a thin wooden dowel so i could make a wire armature for the sculpted end. The decorative end that holds a small fancy marble, was sculpted of Apoxie. In the past I've always made the tops of the staff out of polymer clay, and that does make for better details, as it's easier to form into fine details, but I wanted the strength of Apoxie, so went with that this time. 
Picture
All his props completed....
Picture
3 Comments

Patterns for Miho

2/20/2017

0 Comments

 
Like I'm not stressed out enough trying to work some magic on my Wizard's hair, I'm also trying to make a bodice pattern for Miho.  I started way back in early January, then promptly dropped the ball when I got sick. When I tried to work with the patterns I'd designed back then, nothing would come together properly.  I needed to start completely from scratch, so last night Jan helped me do a second duct tape form. I drew on the seam lines, and numbered all the sections....
Picture
I tucked in a Kleenex skirt, so she could maintain her modesty.
​I think I seriously need to make her some panties.
Picture
After cutting apart the duct tape sections, I created the paper patterns, by tracing and 
modifying some sections as I went along. Then I traced the patterns onto iron-on
​ interfacing, and ironed them onto red cotton to make the first test bodice....
Picture
0 Comments
<<Previous

    Author

    Martha Boers is an award-winning Canadian doll maker and costumer specializing in fantasy and historical-style costumes.
    Read More... 

    Archives

    March 2023
    February 2023
    January 2023
    December 2022
    November 2022
    October 2022
    September 2022
    August 2022
    July 2022
    June 2022
    May 2022
    April 2022
    March 2022
    February 2022
    January 2022
    December 2021
    November 2021
    October 2021
    September 2021
    August 2021
    July 2021
    June 2021
    May 2021
    April 2021
    March 2021
    February 2021
    January 2021
    December 2020
    November 2020
    October 2020
    September 2020
    August 2020
    July 2020
    June 2020
    May 2020
    April 2020
    March 2020
    February 2020
    January 2020
    December 2019
    November 2019
    October 2019
    September 2019
    August 2019
    July 2019
    June 2019
    May 2019
    April 2019
    March 2019
    February 2019
    January 2019
    December 2018
    November 2018
    October 2018
    September 2018
    August 2018
    July 2018
    June 2018
    May 2018
    April 2018
    March 2018
    February 2018
    January 2018
    December 2017
    November 2017
    October 2017
    September 2017
    August 2017
    July 2017
    June 2017
    May 2017
    April 2017
    March 2017
    February 2017
    January 2017
    December 2016
    November 2016
    October 2016
    September 2016
    August 2016
    July 2016
    June 2016
    May 2016
    April 2016
    March 2016
    February 2016
    January 2016
    December 2015
    November 2015
    October 2015
    September 2015
    August 2015
    July 2015
    June 2015
    May 2015
    April 2015
    March 2015
    February 2015
    January 2015
    December 2014
    November 2014
    October 2014
    September 2014
    August 2014
    July 2014
    June 2014
    May 2014
    April 2014
    March 2014
    February 2014
    January 2014
    December 2013
    November 2013
    October 2013
    September 2013
    August 2013
    July 2013
    June 2013
    May 2013
    April 2013
    March 2013
    February 2013
    January 2013
    December 2012
    November 2012
    October 2012
    September 2012
    August 2012
    July 2012
    June 2012
    May 2012
    April 2012
    March 2012
    February 2012
    January 2012
    December 2011
    November 2011
    October 2011
    September 2011
    August 2011
    July 2011
    June 2011
    May 2011
    April 2011
    March 2011
    February 2011
    January 2011
    December 2010
    November 2010
    October 2010

    RSS Feed

Powered by Create your own unique website with customizable templates.