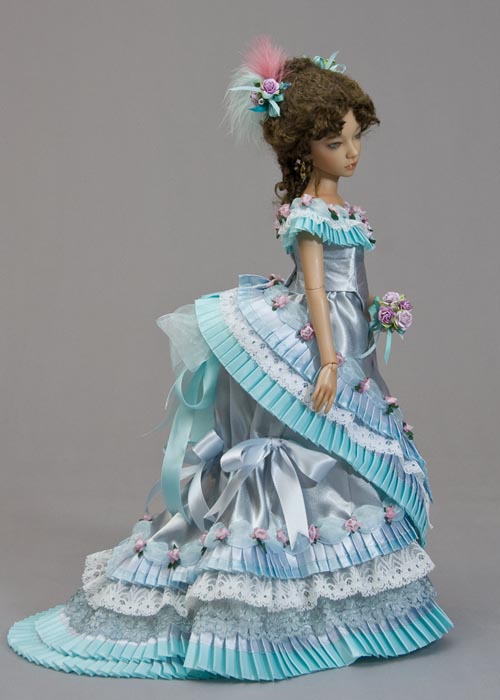
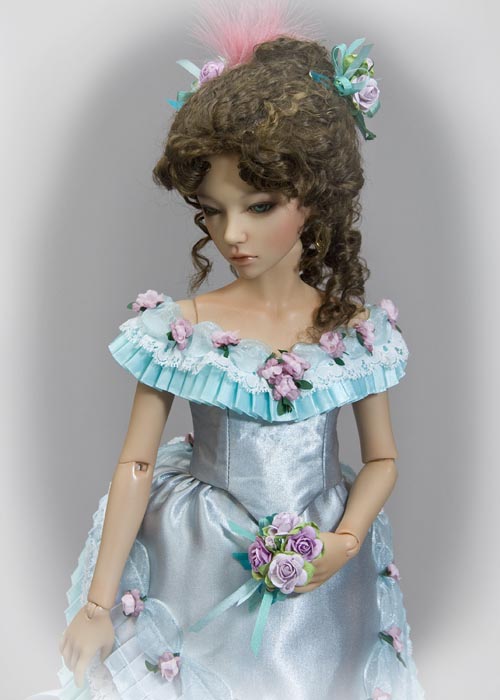
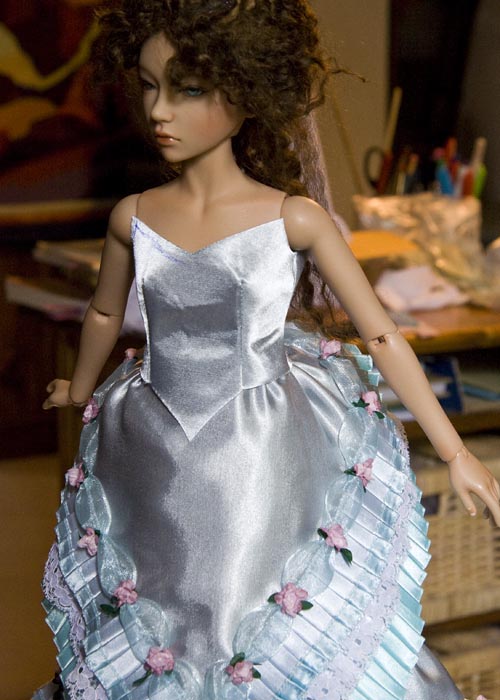
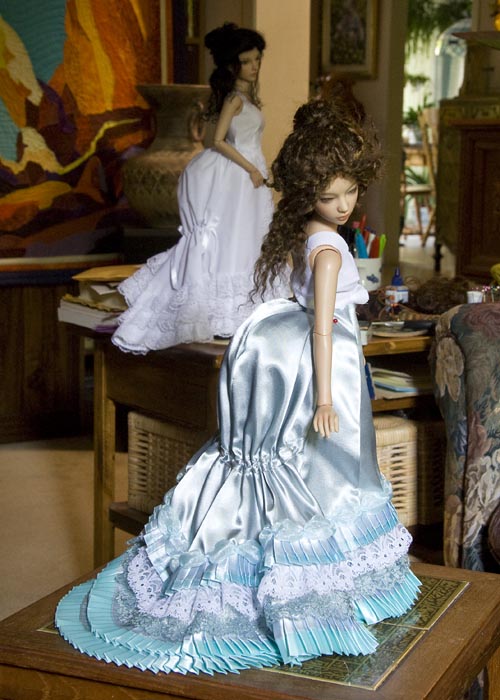
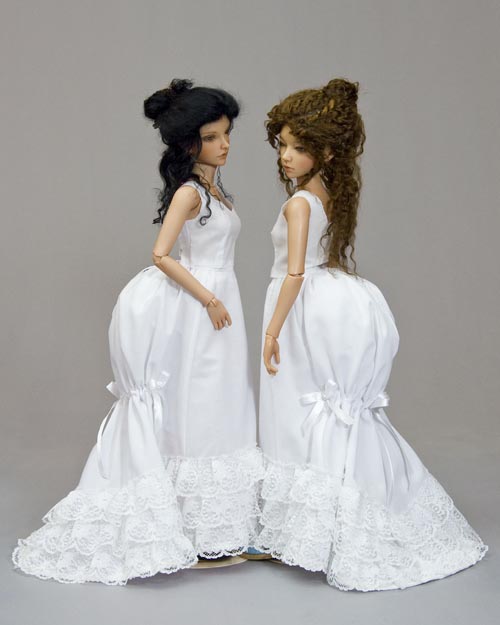
Just for fun, I thought I'd try the Victorian gown on one of my Kaye Wiggs girls - after all, they have almost the same size bodies, so can wear most of each other's costumes. I chose Hope to be the lucky girl, as she's probably going away tomorrow for a body blush and manicure. 
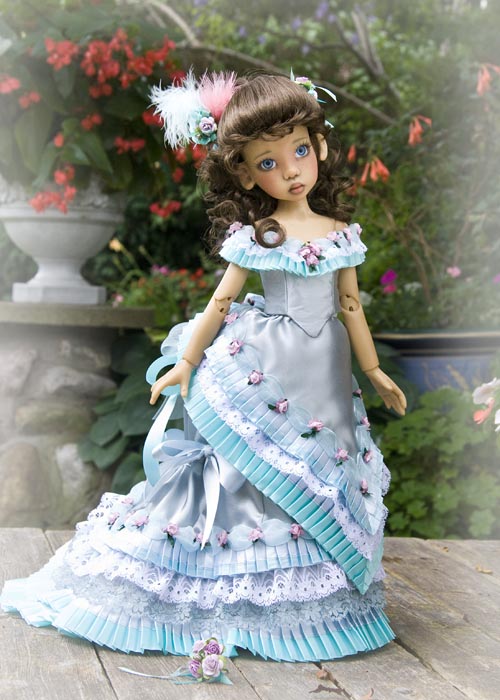
The gown fits Hope perfectly, but it's very interesting how different it looks on her.
I took this photo for someone on RC who wanted to see how Kaye's tinies fit with her SD-size. Nelly towers over Tillie & Cinnamon. Some people make the tinies be little sisters to their
Kaye Wiggs MSD girls, but I personally find that doesn't work for me, as both dolls are similar proportions in different scales. MY KW tinies work really well with my Iplehouse tinies and as little kids with all my non-KW MSDs. Well, I'm finished the first of two Victorian ball-gowns. I've made several Victorian-style gowns for dolls in the past, but those were sewn directly onto the doll. This was the very first time I've made one that had to be removable. I really like how it turned out. Her hair seems a bit "plain" but that's because the wig isn't part of the ensemble, so I can't glue things into it. Now to finish cleaning everything up, and make a "swatch card" to take to
the fabric store with me when I go looking for wine and pink ribbons for the second gown. I'm aiming to finish the minty-gray Victorian gown today. Last night I wet and set Asa's wig into tiny curlers to tame her upswept hairdo. I had to re-baste the pleats on the front overskirt as they were flaring out too much. The trims on the bodice are done.
My workspace is piled high with boxes of supplies: the silk ribbon drawer for a few turquoise ribbons; the feather box for a single pink and aqua fluff; the tiny flowers box for a few mulberry paper roses for her hair; ribbons, beads, threads, needles, scissors, etc. So many huge boxes of stuff just for a few final embellishments! I think I'm going to make a matching necklace and earrings - I wasn't going to, but I don't have anything suitable I can just use for photos. So, that's my job for this afternoon. Then it's clean up time. Friday's are always clean up days. I do need to play with my fabric, ribbon and lace choices for the next gown, to see what goes together and if there's any new ribbons I need to buy. There's a big sale on at Fabricland today, so I should take advantage of that. Both skirts are now almost completely finished - they just need the final ribbons and bows embellishments at the back. I decided to make the two skirts separate, each with their own waistband - that way they would be easier to store - and ship. I was having a hard time deciding whether or not to have a pink satin sash at the waist, as it would make a big difference as to the actual bodice pattern, but in the end decided to go with the more formal-looking point in the front. I designed a bodice pattern, and for the "test bodice" used the actual dress fabric, supported with iron-on interfacing. The armholes needed enlarging and the neckline needed to be lower, but the nice thing about a test-bodice is that I can draw the changes right onto it, and then adjust the pattern. Now to make the proper bodice, and then figure out the trim for the neckline. The dress will have "off-the-shoulder sleeves" which won't actually be "sleeves", just a ribbon strip onto which the trims will be sewn. The challenge will be in keeping the neckline embellishment from getting too wide.
Had to go to two stores looking for more sheer aqua ribbon, but could only find some half the width, so that's what I'm going to have to use for the final layer of puffs on the over-skirt. I'm saving the last piece of wide sheer aqua ribbon for the upper bodice. I also pulled out all my boxes of tiny flowers to see which colour looked nicest with the mint and gray. I looked at blues, darker aquas, various pinks, and those ribbon roses everyone else uses. But in the end I decided to go with making up my own flowers out of pink and dusty rose fabric flower bits. I'm sewing a faux pearl into the center of each flower, and backing each one with a tiny bit of greenery. I have to sew the tiny flowers all the way around the bottom of the over-skirt as well. I was going to sew the two skirts together onto one waistband, but now I'm thinking each skirt will have it's own waistband. It will make the outfit easier to store.
I hate heat, and this summer has been record-breaking, and it's not even half over yet! This is Canada, the "Great White North", land of ice and snow, the polar bear and igloos - not some tropical get-away. Today we are set to break all records - again. I've never seen a forecast of 37 Celsius, and that's not including the humidity. Thank goodness for air-conditioning! But even that isn't enough to keep the heat from permeating everything. Sewing is becoming a real struggle in this heat, but better to make slow progress than none at all. I'm working on the overskirt for the minty-gray Victorian ball-gown, which comes down to a point in front. It will be flat with many of the same trims as the main skirt. It's a bit challenging making the pleated trim come to a neat point down at the front, but I think it's looking good. Now to press it and sew it onto the over-skirt edge. Then make the next two rows. As much as I can't stand this hot weather - and most of my garden doesn't care for it either - there are a few plants which are loving it. My poor impatiens are cooking daily and have barely any flowers, yet the geraniums have never looked better - they LOVE sunshine and heat. My day-lily collection is in full bloom too. It's too bad each flower only lasts one day, but each stem does have a lot of buds, so I do get to enjoy them for several weeks. Here's some photos... What I really miss is pink. I used to have a huge collection of Asiatic lilies, but an invasion of Japanese lily beetles made short work of them. The beetles don't seem to like day-lilies, so we invested in quite some collection of them a few years back. But day-lilies don't come in true bright pinks - like my favourite Asiatic lily - the bright pink, spotted Star Gazer......
All the rows of trim have been sewn onto the minty-gray underskirt. There's still a lot of embellishment needing to be done by hand, but it has to wait until the over-skirt and bodice are done, so I can see the entire outfit and decide on the colour of the final details. This photo, taken by natural light in my work-space, is a lot closer to the actual colours of the skirt, than the photo of the trims I took outside yesterday. For some reason, the turquoise ribbon and gray lace looked a lot darker than they really are, and the lovely aqua/blue sheen of the gray satin was all washed out. Maybe it was the hot, humid, pre-thunderstorm lighting.
I'm building up the embellishment layers on the bottom of the first under-skirt. It's like decorating an elaborate, old-fashioned, wedding cake, but with laces and ribbons, adding layer upon layer to achieve the final effect. I couldn't find any appropriate colour ribbons the right width, so have sewn mint ribbons onto the edge of the gray ribbon. Then I have to pin every pleat by hand, then hand-sew the top edge. I can't press the pleats with the pins in them or the pins will leave unsightly marks, so the bottom edge needs to be basted as well. It takes several hours per pleated row.
I'm thinking maybe pink roses as an accent, but I have to wait and see when I'm further along. I thought I'd use Isar as the photography model for the second Victorian gown. She has a larger bust than Asa, who the gowns are being made to fit, but for photo purposes she should still work. I pulled out some test bodices for the two of them to wear temporarily so they could maintain their modesty, and tied up two wigs in something to suggest softly upswept hairdos. I think I may seriously need to make some proper Victorian-styled wigs just for the final photo sessions. Well, here they are in their underwear. I am asked why I bother putting so much effort into the under-clothes when they aren't even going to show. Well, because it's part of the costume, and without the proper under-pinnings the actual costume would not hang correctly. Plus, I don't like to cut corners - do it right, or not at all! What I found interesting when I took this photo was the differences in the girl's two bodies. I've never photographed the two of them together before. Asa has the old JID body, and Isar has the new JID body. Both are wearing tights and shoes with the same thickness of sole. Isar's shoulders are quite a bit higher, but because she has a smaller head, the two dolls are still the same height. Of course, to really compare their heights I should take off their wigs, but after putting so much effort into trying to style them, I think I'll just leave them on for now.
I've started on the minty-gray gown, mostly because I have a complete selection of fabric, ribbons, laces and trims I like, and I can picture how they are going to go together. I've sewn the basic under-skirt, and started making the rows of pleats. |
AuthorMartha Boers is an award-winning Canadian doll maker and costumer specializing in fantasy and historical-style costumes. Archives
April 2024
|