"Queen of the Night", a Creative Journey

|
Several years ago, I made a OOAK art doll to represent the "Queen of the Night", from Mozart's "the Magic Flute". The doll went on to a new home, but I've never been able to get her costume out of my mind. Ever since getting into the BJD costuming hobby, I've wanted to make a duplicate of that costume for one of my ball-jointed dolls. The problem was always deciding which doll to make it for, and finding enough time between commissions to actually make it. I still had left-over supplies of most of the materials, so decided the doll would have to be an MSD size, to better approximate the size of my original doll. Now that I'm actually going to start working on the costume, I've decided to document my progress in this "Creative Adventure" album. I won't be sharing patterns - just my ideas and techniques - but maybe those will be interesting or helpful enough. |
One of the main things holding me back from starting the Queen of the Night costume, was finding the right main dress fabric. I still had enough of everything I'd used for the original gown - except that embroidered blue taffeta. I've looked everywhere, and have purchased at least eight different dark blue fabrics from which I'm now going to have to choose.
Preliminaries - Who Will Become Queen?
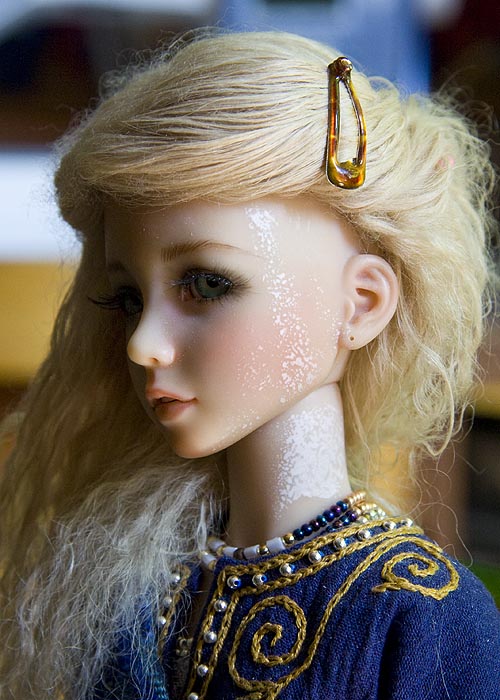
In the summer of 2013 I finally decided my Iplehouse JID Asa would become my "Queen of the Night". She had faceup chipping issues, and needed a new faceup anyway. I'd recently acquired JID Soa, and she could step into the costumes and characters that were originally created for Asa. So I brought my Asa away to Charie Wlison Grenier (who does all my doll's faceups) for a new more dramatic faceup.
Asa's new faceup was perfect for the character! Now she needed the costume.
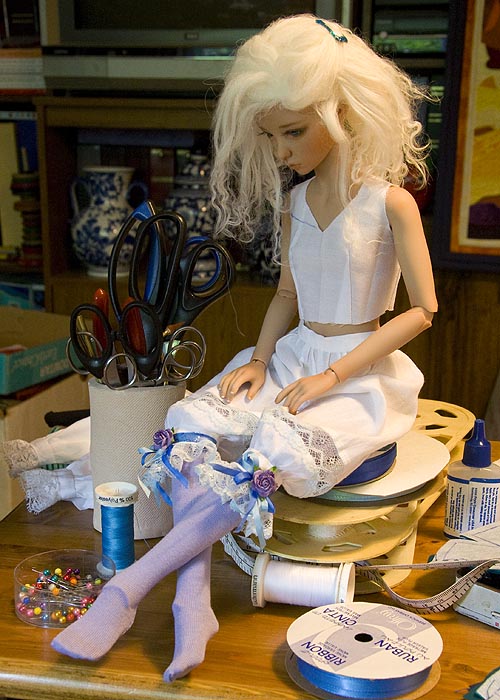
Stockings and Underwear
|
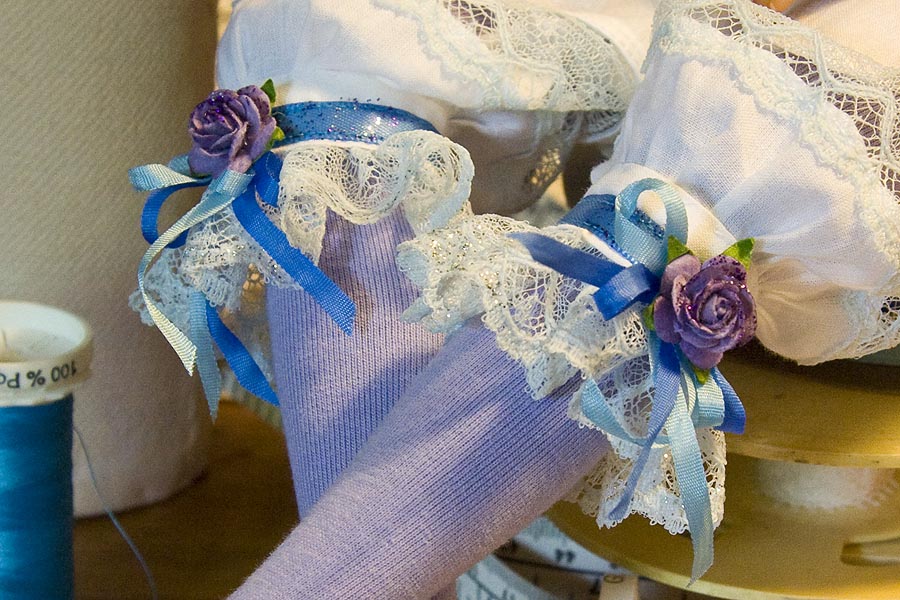
I usually make tights to go under my doll's costumes, but wanted to keep bulk at the waist to a minimum, so made stockings instead. Soa was my stocking and underwear model while Asa was away getting a new faceup. The pantaloons are of fine cotton, and I decided to make them fancier by adding a lace insert above the knees. Added some blue & purple silk ribbon bows and a purple paper rose as embellishment. |

|
the Mask
*In order to prevent this thread from becoming too massive, the more detailed Apoxie Mask construction
details are posted as a separate Tutorial. Click on photo to go to Mask Tutorial....
details are posted as a separate Tutorial. Click on photo to go to Mask Tutorial....
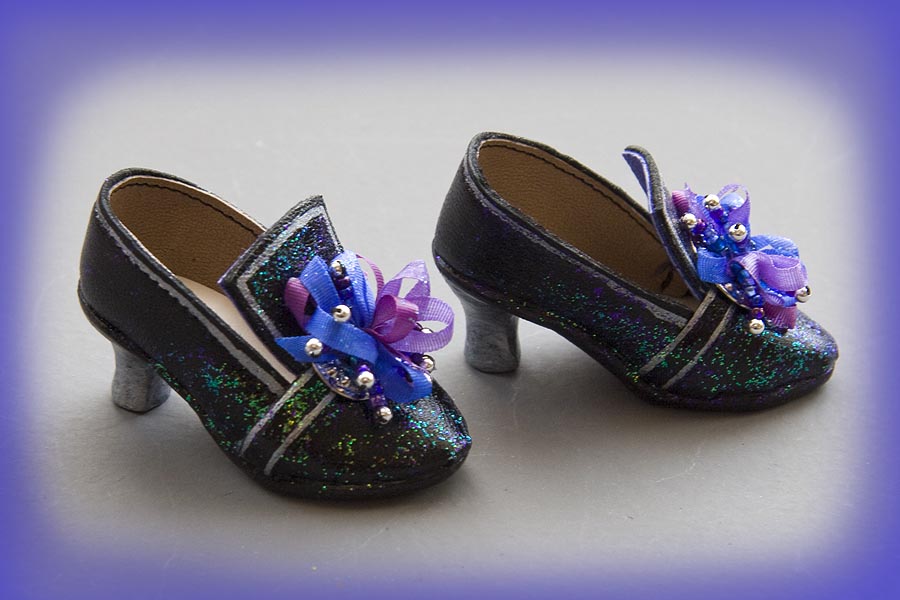
the Shoes
*In order to prevent this thread from becoming too massive, the more detailed Rococo Shoe construction
details are posted as a separate Tutorial. Click on photo to go to Rococo Shoes Tutorial....
details are posted as a separate Tutorial. Click on photo to go to Rococo Shoes Tutorial....
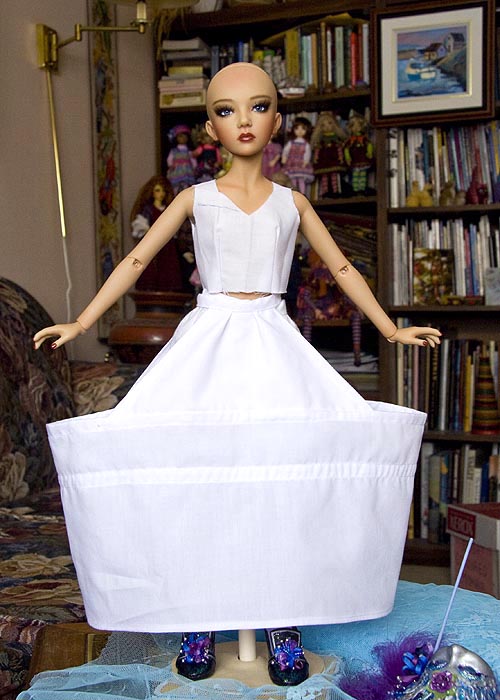
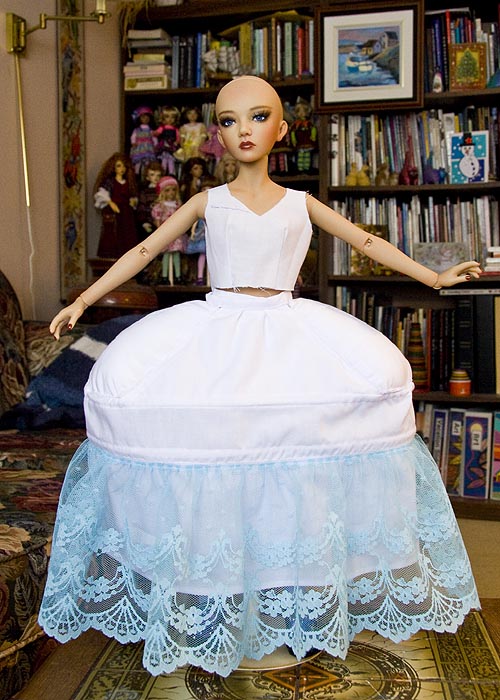
The Underpinnings
Jan 25 - Even though the gown is inspired by costumes from the Rococo period, I'm not a fanatic about historical accuracy,
so am not going to stress over making everything exactly period perfect. All I want is something stable to hold out the skirts.
Here's Asa with the basic pannier-slip I designed. The waistband hangs low at the waist in order to reduce bulk at the waist,
as there's still another two skirts that have to go on top of it. There's two channels sewn on the inside for wires, and it needs padded hip rolls to fill out the upper sides. Without the wires it's hanging rather oddly, but with the wires and hip pads it
will take on the proper shape.
|
|
The hip pads had to be designed after the main pannier structure was wired, because I needed to know the exact
size and shape of the space to be filled. After sewing and stuffing, I had to hand-stitch the pads into place. Next
time I need to make one of these it can be made altogether in one piece, and that should be a lot easier.
size and shape of the space to be filled. After sewing and stuffing, I had to hand-stitch the pads into place. Next
time I need to make one of these it can be made altogether in one piece, and that should be a lot easier.
the Underskirt
Jan 27 - I have to design the pattern for the underskirt, but am not sure yet what length to make it. I want to switch Asa's body with my new Leona who has the newer JID girl body and the larger glamour bust. The new bodies stand about 1/2 taller at the shoulder than the old bodies, so the skirts will need to be lengthened accordingly. I'm going to use Leona to design the skirt patterns.
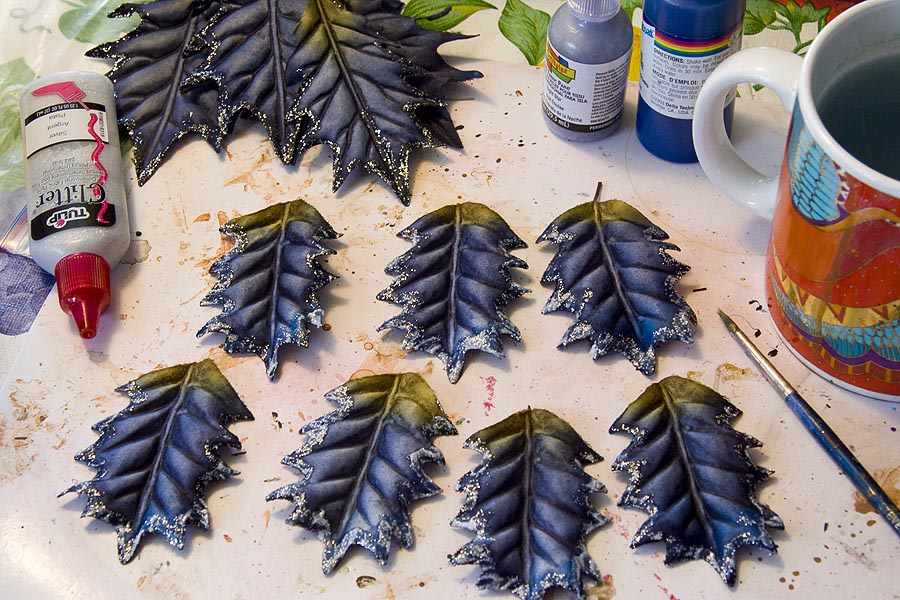
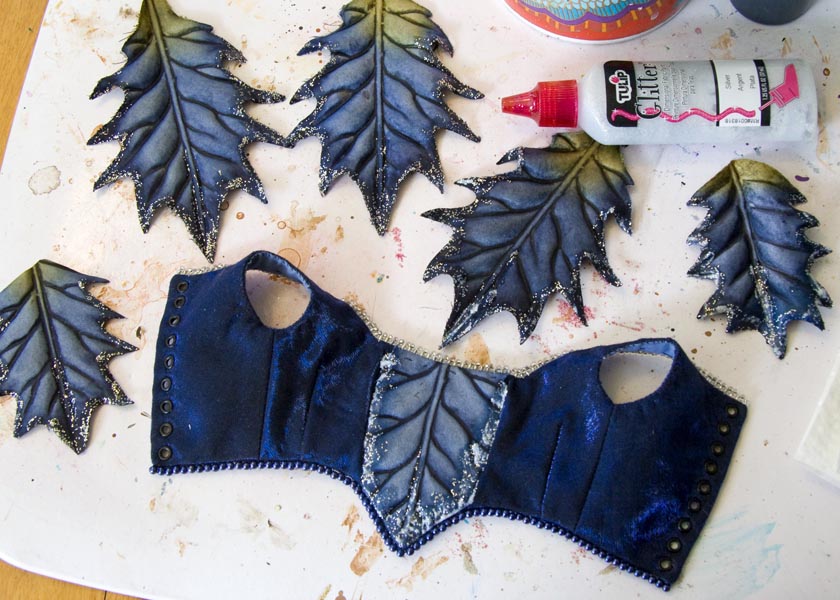
In the meantime, I've painted the edges of the blue flower petals that are going to be sewn onto the underskirt. The petals are from blue poinsettias I bought many years ago. The veining in the petals reminded me of the underbelly of a dragon. I wish I'd bought more of them, as I've never seen them again. Fortunately I do have enough petals for my Asa's gown, but I'll have to use the less pointy ones I didn't use last time. After painting any light edges a dark blue, I brushed on some silver glitter paint.
In the meantime, I've painted the edges of the blue flower petals that are going to be sewn onto the underskirt. The petals are from blue poinsettias I bought many years ago. The veining in the petals reminded me of the underbelly of a dragon. I wish I'd bought more of them, as I've never seen them again. Fortunately I do have enough petals for my Asa's gown, but I'll have to use the less pointy ones I didn't use last time. After painting any light edges a dark blue, I brushed on some silver glitter paint.
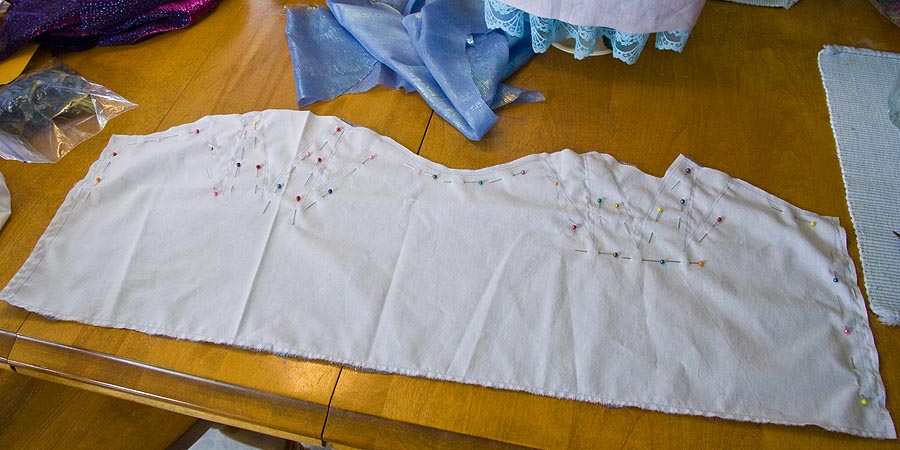
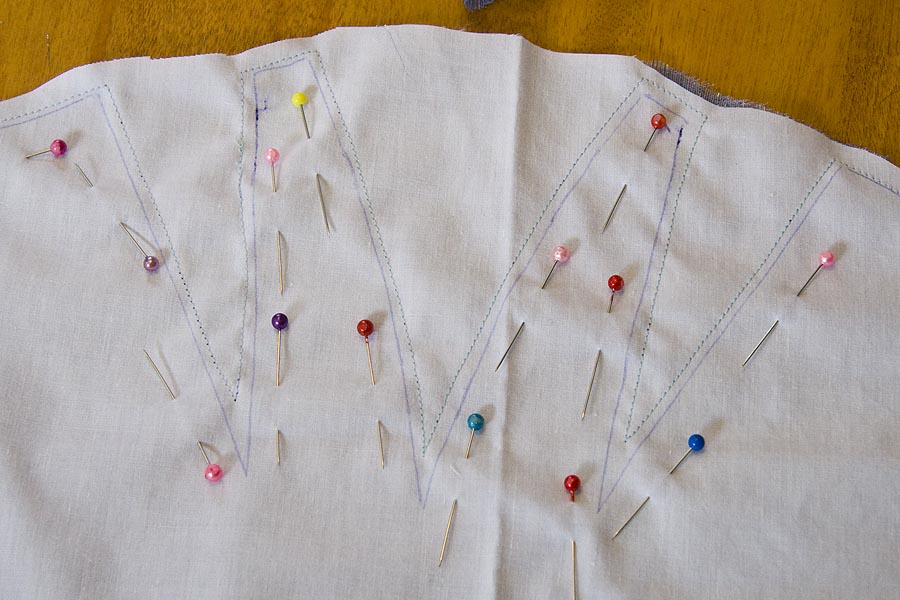
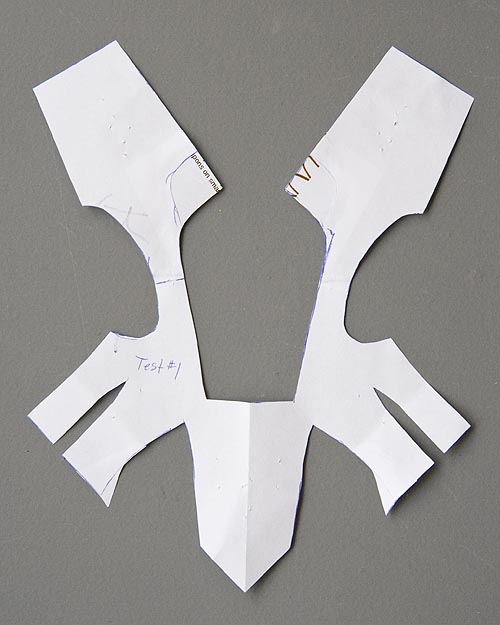
Jan 28 - The pattern for the Queen's underskirt was a challenge. The skirt needed to be a bit bigger than
the petticoat with panniers underneath, and it needed to gather nicely in front and fit smoothly over the
hip panniers without any extra bulk. So, using the under-pinnings patterns as a guide, this is what the
underskirt pattern ended up looking like....with large darts on both hips....
the petticoat with panniers underneath, and it needed to gather nicely in front and fit smoothly over the
hip panniers without any extra bulk. So, using the under-pinnings patterns as a guide, this is what the
underskirt pattern ended up looking like....with large darts on both hips....

Then I had to make up a sample skirt to see if the pattern worked. I always save old bed
sheets for test garments so I don't have to waste good fabric. I think it's looking good.....
sheets for test garments so I don't have to waste good fabric. I think it's looking good.....
Jan 29 - It's time to cut out the underskirt from the good fabrics. I've gathered several
of the embellishments together to feel inspired
of the embellishments together to feel inspired
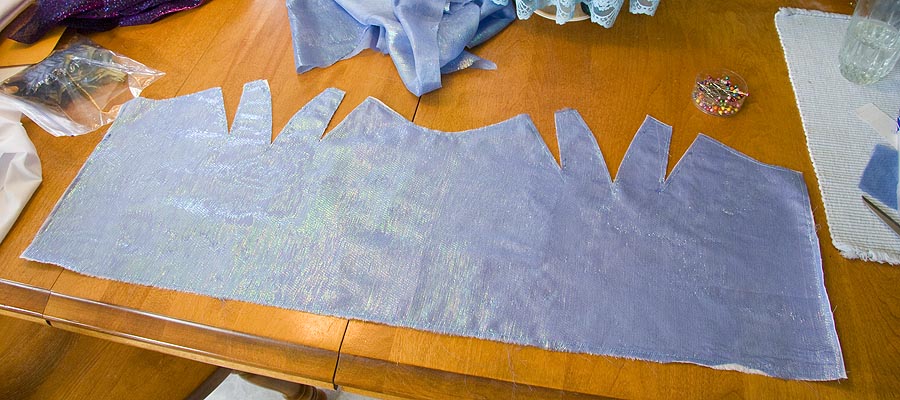
But first the basic skirt. Both fabrics I'm using are sheer metallics, and the pale periwinkle blue is especially thin and flimsy, so it needs to be supported by white cotton backing. I lay the two fabrics on top of each other, smooth them out and pin the layers together. After tracing the pattern onto the back of the cotton, I cut out the skirt, but decide not to cut out the darts.
The pale blue fabric is so flimsy, and moves so much, that I want to first sew the two layers of fabric together.
I stitch all the way around the skirt edge, stitching inside what will be the seam allowance.....
I stitch all the way around the skirt edge, stitching inside what will be the seam allowance.....
Then I cut out the darts......Here's the right side. Even with all the care I've taken to prevent the
fabric from moving, there's still a small spot on the back hemline that doesn't match.
fabric from moving, there's still a small spot on the back hemline that doesn't match.
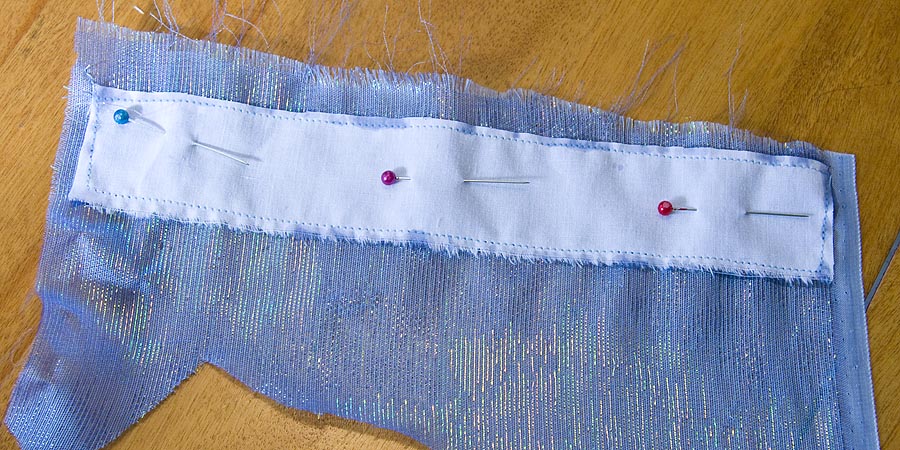
So, to prevent slipping and missmatching, I decide to baste the cotton waistband onto the blue fabric before cutting it out....
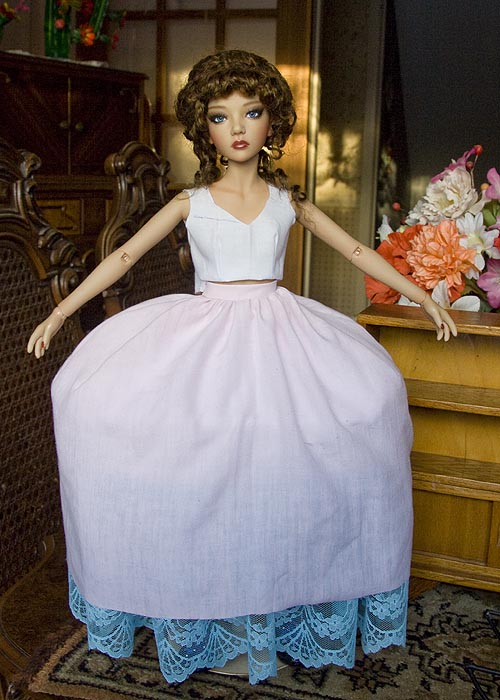
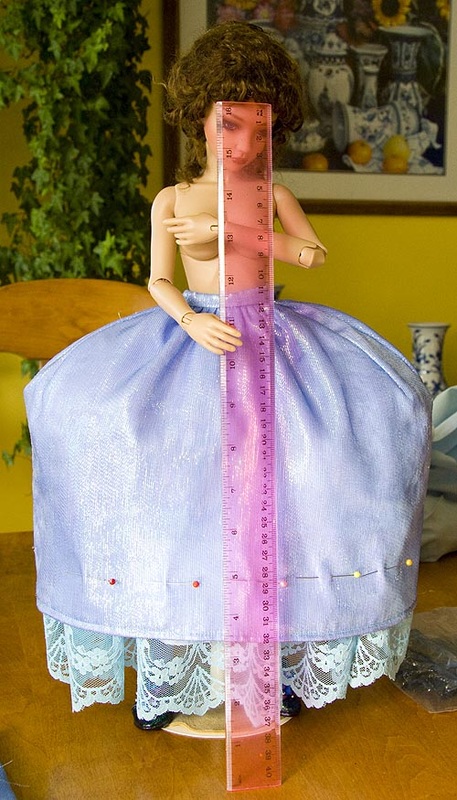
With the upper underskirt sewn, I put it on Asa. I've switched her onto Leona's glamour bust body so I know the correct
length of skirt to aim for, and using a ruler, measure and pin a line around the bottom where I want the ruffle to go.
length of skirt to aim for, and using a ruler, measure and pin a line around the bottom where I want the ruffle to go.
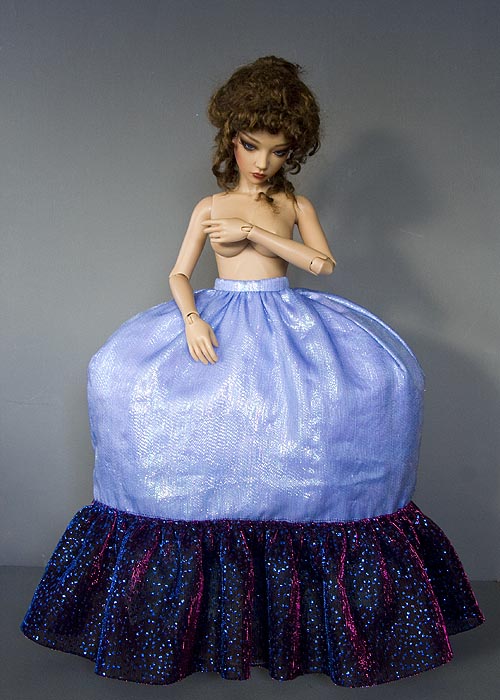
The dotted red and blue metallic is very sheer, so I cut a strip twice as wide as I need, and fold it in half lengthwise to
double the thickness, so it's not as see-through. The ruffle width is just over double the circumference of the bottom of
the upper skirt. After sewing on the ruffle, the skirt is ready for embellishments. I've switched Asa's head onto Leona's
glamor bust body. The resin match is excellent. All she needs now is some blushing, and her own hands.
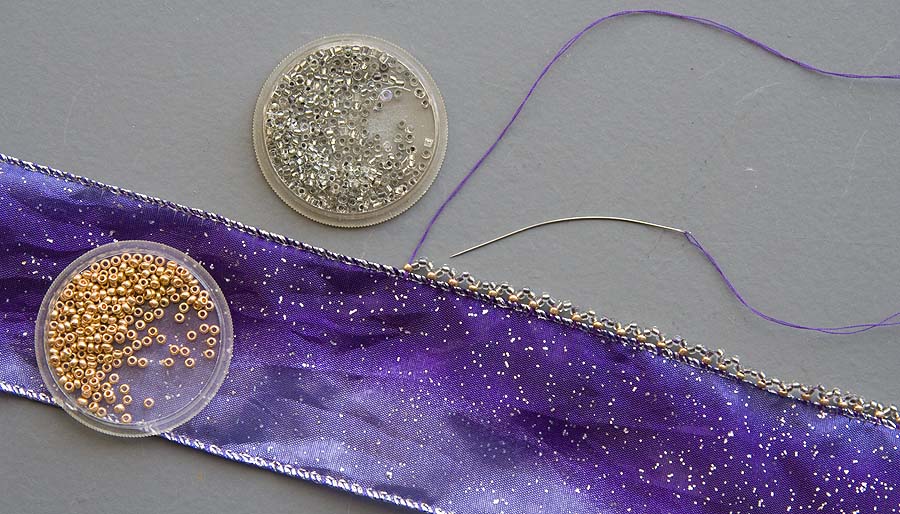
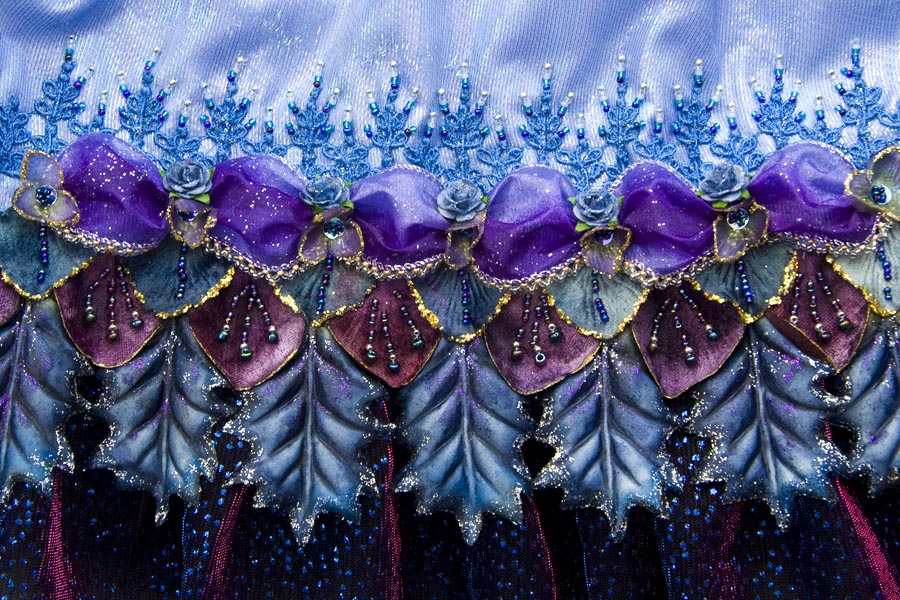
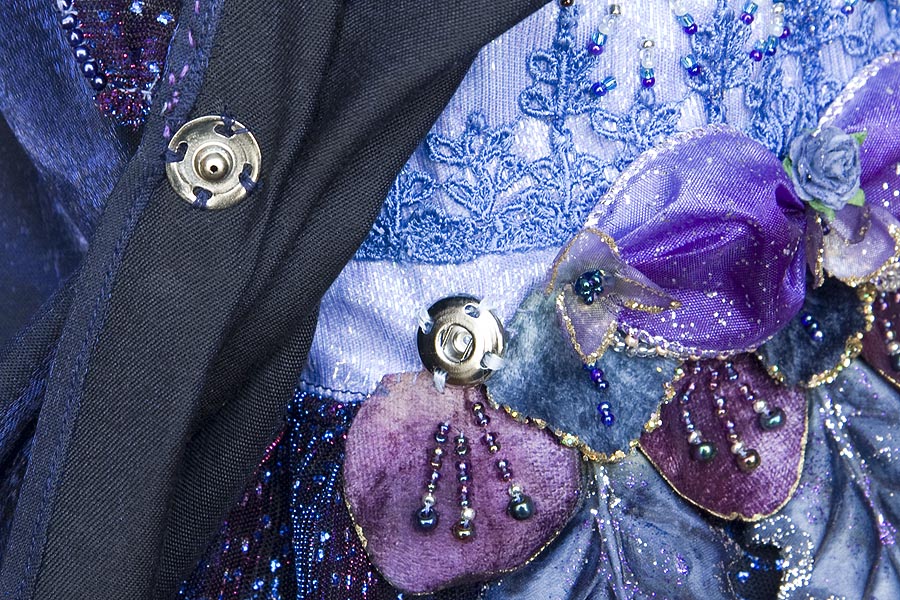
Feb 1 - The first layer of embellishment is now on the underskirt. I hand-stitched on the fancy blue lace - first sewing along the bottom edge, an inch above the ruffle, and then all the way around again tacking down everything on the fancy upper edge. The work went very slow, as handwork always does - it took over three hours!

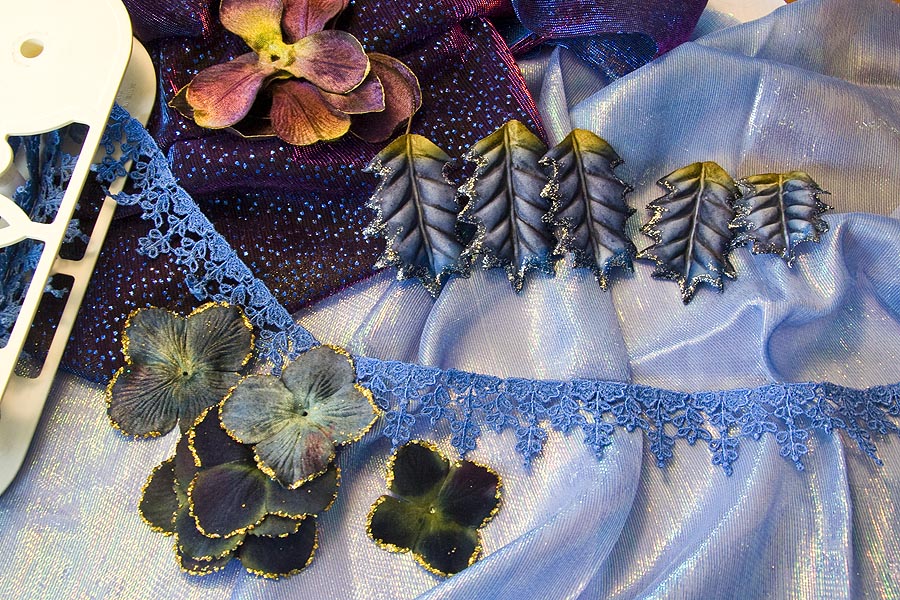
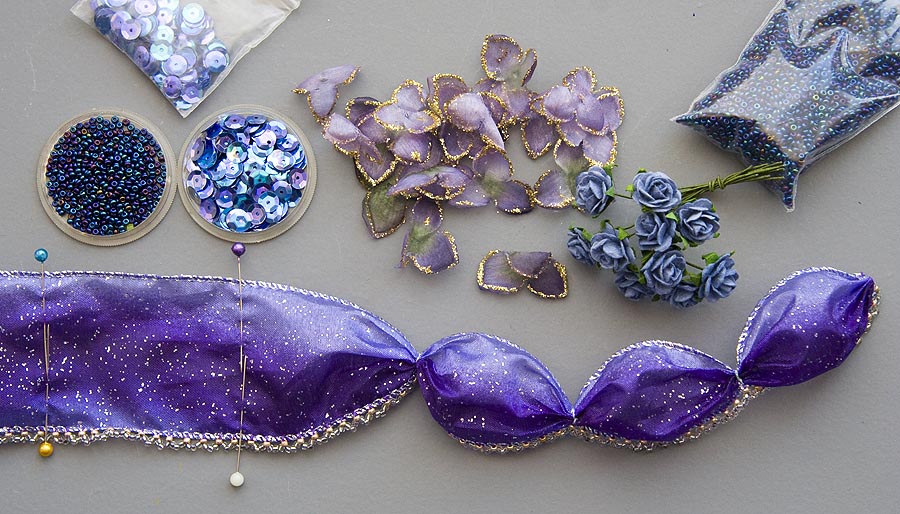
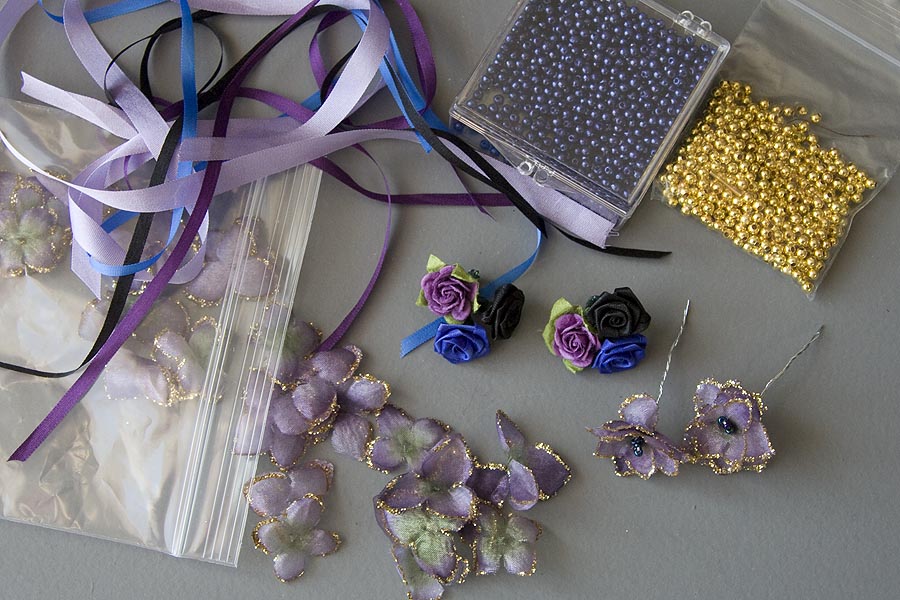
Hand-sewing is very labour-intensive, and this is just the very beginning. I've gathered all the trims and beads that need to go on the underskirt. There's three different petals from Christmas Hydrangeas, purchased the same year as the blue poinsettias. They will all only go on the front half, as there's no point putting all that detail work into something that will never show.
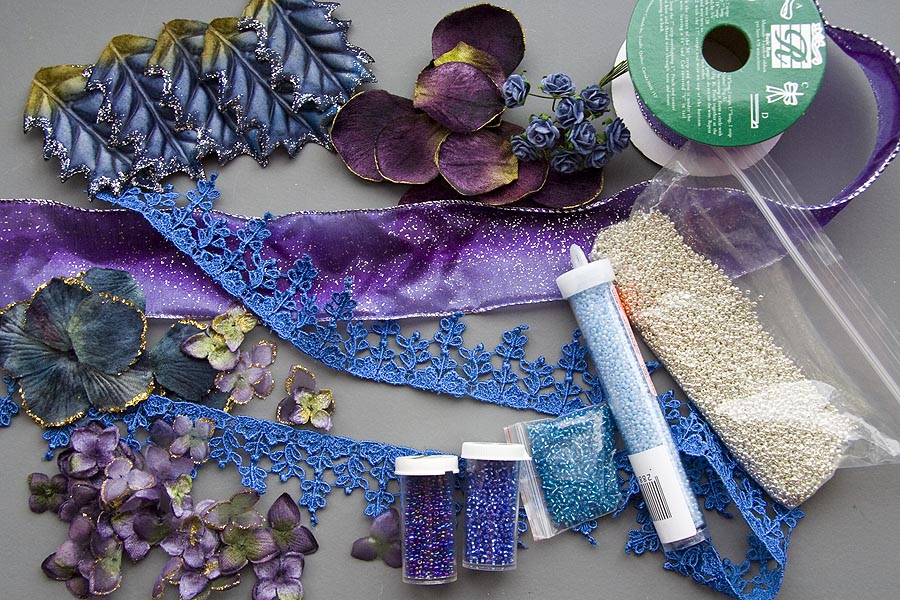
Feb 2 - I've finished the beading along the edge of the blue lace, and have completed two rows of flower petals along the top edge of the ruffle. The purple velvet petals are from a fancy Christmas Hydrangea which was purchased the same year as the blue poinsettias. It's so nice to still have enough left-over trims from the original costume. There's still one more row of flower petals to go, and then I have to bead the edge of the ribbon which will be sewn into puffs to fill the space between the petals and the blue lace. (*Note: the safety pin is marking center front of the skirt)
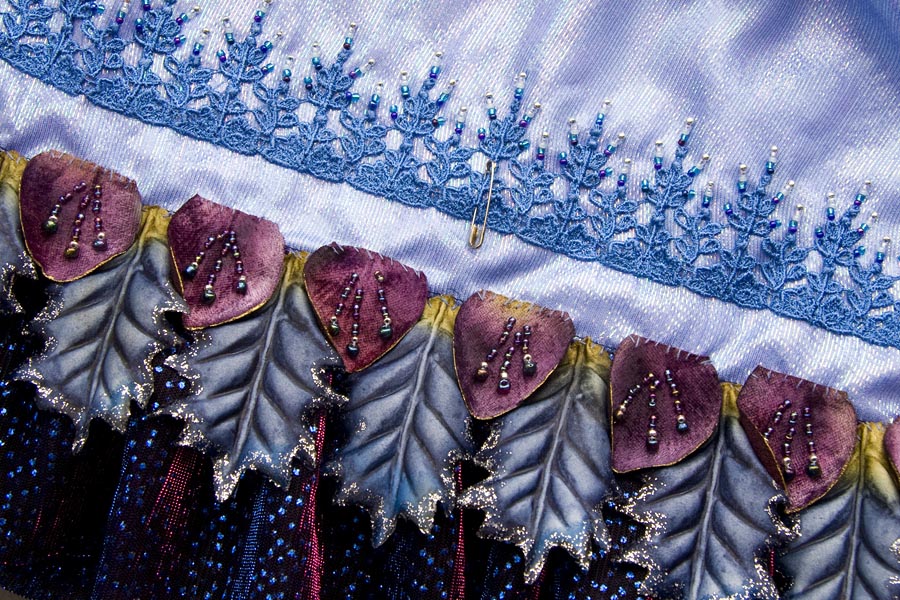
February 3 - I stitched the final row of velvet petals onto the skirt, then measured how much ribbon I'd need for the puffs that will fill the space between the lace and the petals. The bottom edge of the ribbon needed bead embellishment. I used the picot stitch, but used three beads in the middle each time instead of just one.
After beading the edge of the ribbon, I carefully divided it into six equal parts, and pre-stitched each section.
I gathered all the trims I'd need for the puffs.
I gathered all the trims I'd need for the puffs.
The finished underskirt embellishments...after sewing everything on, and adding a bit more glitter...
The finished underskirt. Soa is my model again, since both Asa and Leona went to my faceup artist yesterday. It's handy
having several JIDs who can step in for each other. I just can't work on the bodice, because Soa has the small chest.
having several JIDs who can step in for each other. I just can't work on the bodice, because Soa has the small chest.
the Overskirt
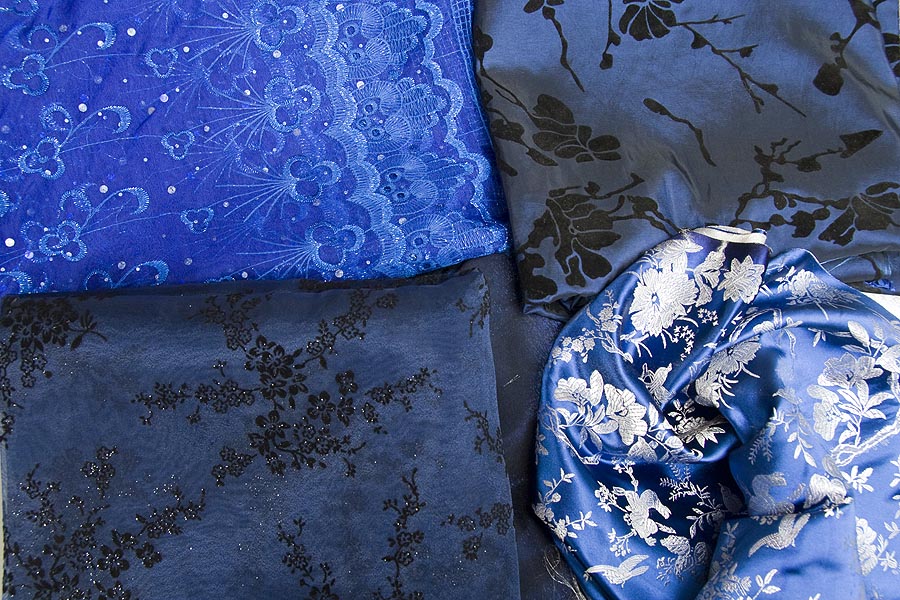
The next step will be the hardest part of the entire project - deciding on the main fabric for the dress. I don't know
what happened to the leftover original fabric, but I couldn't find any. It was a beautiful navy blue taffeta with silver
floral embroidery. I spent years looking for a replacement - something that would come reasonably close.
what happened to the leftover original fabric, but I couldn't find any. It was a beautiful navy blue taffeta with silver
floral embroidery. I spent years looking for a replacement - something that would come reasonably close.
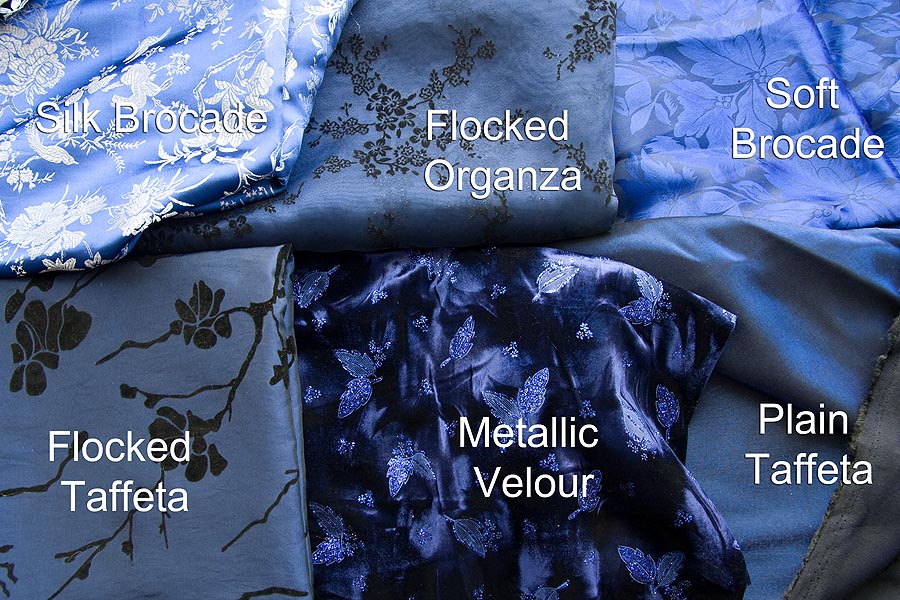
I'm going to have to choose from these six fabrics. The metallic velour comes closest pattern-wise, but it's so completely period-inappropriate. The flocked organza is very nice, with appropriately scaled flowers, but it's a sheer fabric and will need a lining - which is why I bought the plain taffeta. The flocked taffeta is the right kind of fabric, but the flocked flowers are way too big a scale. The silk brocade is nice but the silver birds and flowers stand out too much. I wonder what would happen if I over-dyed it?
I'm just going to have to play with them all and see how they look, and how they drape. Then I'll have to decide.
I'm just going to have to play with them all and see how they look, and how they drape. Then I'll have to decide.
February 4th - I've decided to go with the plain dark blue taffeta. It doesn't have any patterns or embroidery, but it drapes the best, and will look very elegant with all the more elaborate parts. The back of the gown will be covered by the sheer cape with sparkly stars and moons anyways, so that can create interest in the back. So now I have to come up with an overskirt pattern.

I use some old sheeting, pin it in place, and cut for the skirt. That will be my pattern. I just need to add seam allowances. I've tried to tone down the colours a bit in the photo above, so they are more like what the colours look like in real life. The blue lace is still a bit too dark, but the other colours are pretty good.
The Queen of the Night is one of the main character from Mozart's "the Magic Flute". It actually takes place in ancient Egypt, but when I made my original Queen, I was going more for the style the original costumes would probably have been - in the period fashions of the day. I was assuming that Mozart pre-dated Napoleon and his adventures in Egypt, so costumes and sets would be pretty much left up to the imagination, since they didn't know about true ancient Egyptian styles yet. I could be wrong, but that's what I was going with. So, when I made my "Queen of the Night" I decided to make a roughly period-style gown in dark, rich blues and purples like the night sky, with lots of sparkles and glitter to represent the stars.
The Queen of the Night is one of the main character from Mozart's "the Magic Flute". It actually takes place in ancient Egypt, but when I made my original Queen, I was going more for the style the original costumes would probably have been - in the period fashions of the day. I was assuming that Mozart pre-dated Napoleon and his adventures in Egypt, so costumes and sets would be pretty much left up to the imagination, since they didn't know about true ancient Egyptian styles yet. I could be wrong, but that's what I was going with. So, when I made my "Queen of the Night" I decided to make a roughly period-style gown in dark, rich blues and purples like the night sky, with lots of sparkles and glitter to represent the stars.
February 5 - Yesterday I cut out the overskirt and hemmed it by hand - which took quite some time. I machine-stitched the front openings as they won't show under the embellishment, but the hem will, and they didn't have sewing machines back in the Rococo period, so a machine-stitched hem would look totally wrong. So, it had to be hemmed by hand.
After measuring where the trim would go along the upper front opening, I cut some of the same dotted sheer as the bottom ruffle of the underskirt. I stitched it over the skirt fabric, then decided it wouldn't work that way, as there needed to be a bit of a curve on the front edge of the skirt. I tried picking it off with my seam-ripper, but I can't see detail in dark fabrics anymore, so ended up cutting it off instead - along with some of the edge of the taffeta. Oh well, some Fray Check and zig-zagging over the cut edge, and it will be just fine. Then I cut some new strips a bit longer so I could gather them slightly to make a a bit of a curve. After positioning the velvet petals, they were stitched down. I'm in the process of beading the petals on the second front opening.
After measuring where the trim would go along the upper front opening, I cut some of the same dotted sheer as the bottom ruffle of the underskirt. I stitched it over the skirt fabric, then decided it wouldn't work that way, as there needed to be a bit of a curve on the front edge of the skirt. I tried picking it off with my seam-ripper, but I can't see detail in dark fabrics anymore, so ended up cutting it off instead - along with some of the edge of the taffeta. Oh well, some Fray Check and zig-zagging over the cut edge, and it will be just fine. Then I cut some new strips a bit longer so I could gather them slightly to make a a bit of a curve. After positioning the velvet petals, they were stitched down. I'm in the process of beading the petals on the second front opening.
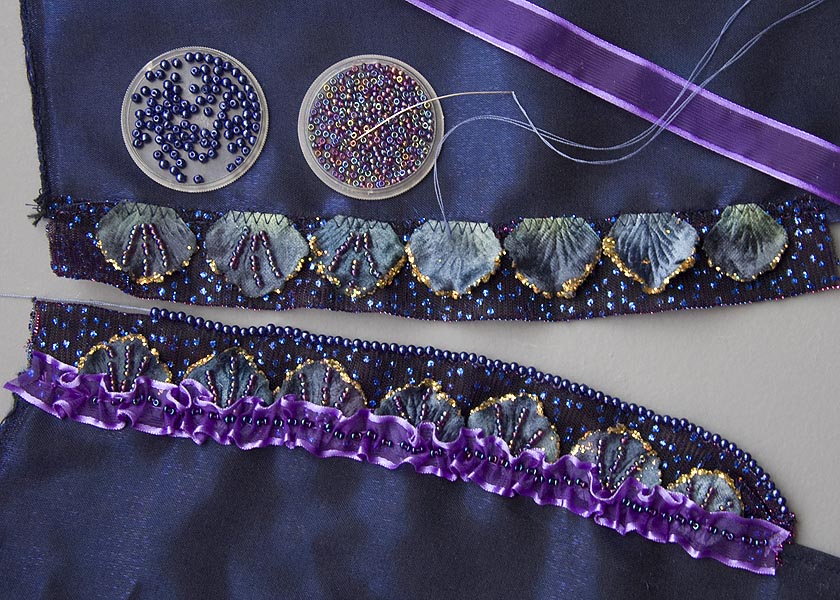
I would have liked to have made the narrow purple ruffle a bit fuller, but there wasn't enough of the purple ribbon to cut it 3 times the length of the space it would fill - well, there was, but then there wouldn't have been any left for the bodice. So I had to go with just double. I have to pay attention not to bead right to the top of the skirt (far left) since I'll need space for the sewing machine foot when I sew the skirt to the waistband.
February 6 - Finished the beading on the second side, and it was time to attach the skirt to the waistband. I cut the waistband out of the dark blue fabric, and because the fabric frays super easy, I Fray Checked all the edges. I had originally planned on having the skirt open at the front, but it would mean being super exact with the measurements. I figured there would be more leeway if I made the opening at the back. Then if the waistband was a bit wide, it could overlap a bit - something that would not be possible if the waistband opened at the front.
The top of the skirt was going to be very bulky to gather onto the waistband, so I decided to sew darts at the top, in order to reduce the amount of fabric. I sewed sixteen darts across the top of the skirt, and trimmed off the excess fabric, zig-zagging the raw edges. It's a good thing I went with a back opening, because the waistband ended up overlapping by almost an inch.
Here's the overskirt with the side panels pinned back.
February 8 - I didn't do much on my Queen's dress yesterday, as I was busy redressing everyone that came back from Charie's. I've sewn some very large snaps on the inside of the overskirt, so the side panels can snap into position on the overskirt....
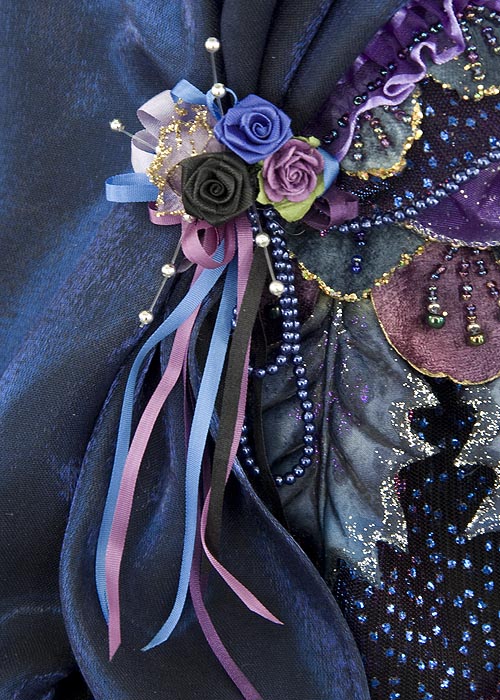
The next step is to sew the embellishments onto the other side of the snap, but I had misplaced the small bag with glitter-edged, sheer flower petals I needed to make some flowers for the tie-backs. It had been right there in the morning, but disappeared later. I looked everywhere - twice, but couldn't find it anywhere. The next day, I was cutting silk ribbons, then realized I'd had the silk ribbon drawer out the morning my baggie with flower petals disappeared. So I went to look, and sure enough, there they were, right in the top. I made two flowers out of several sets of petals, and painted the stems on the ribbon roses.
Here's some of the embellishments to finish off the over-skirt.....
Here's some of the embellishments to finish off the over-skirt.....
...and the overskirt with the embellishments sewn on. I still need to apply some glitter, but that can wait....
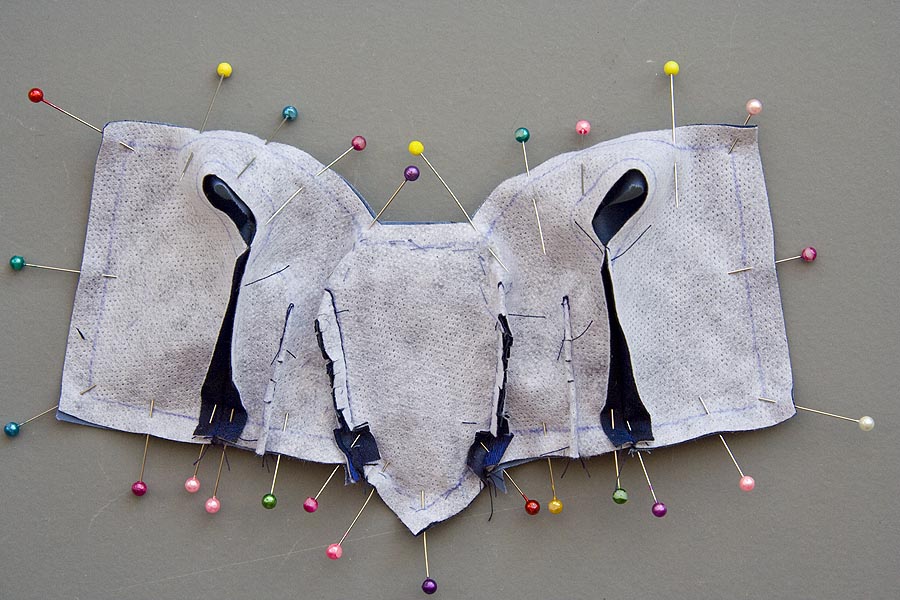
the Bodice
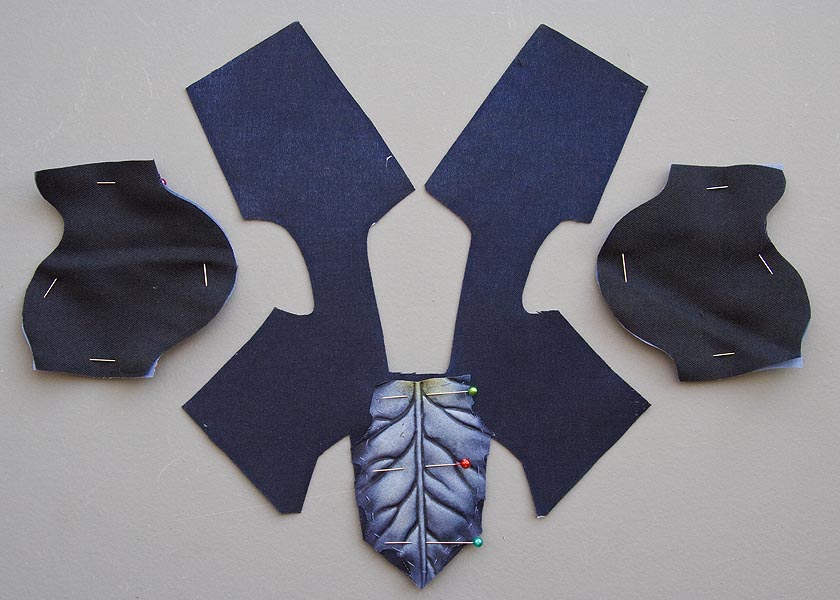
February 9 - Time to draft the bodice pattern. This is the very first time working with a glamour bust so I have to start from scratch - almost. I folded a paper towel in half and traced the neckline from a small bust pattern, cut it out, and using painter's tape, taped it into position onto her shoulders. Then pinned it center front at the bottom. I drew the darts and seams just on the one side. Then I removed the paper towel folded it back in half along center front, and cut out the "pattern".
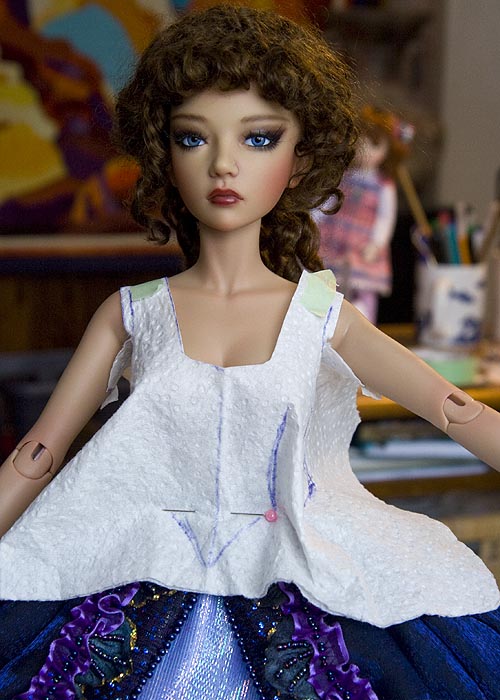
I added the back at the shoulder and traced everything onto some sturdier scrap paper, then cut the first
test bodice out of white cotton, cutting off all the outer edge seam allowances, and stitched it together.
After making adjustments to the fabric test bodice, and the paper pattern, I cut out a second test bodice...
test bodice out of white cotton, cutting off all the outer edge seam allowances, and stitched it together.
After making adjustments to the fabric test bodice, and the paper pattern, I cut out a second test bodice...
The final bodice pattern
|
|
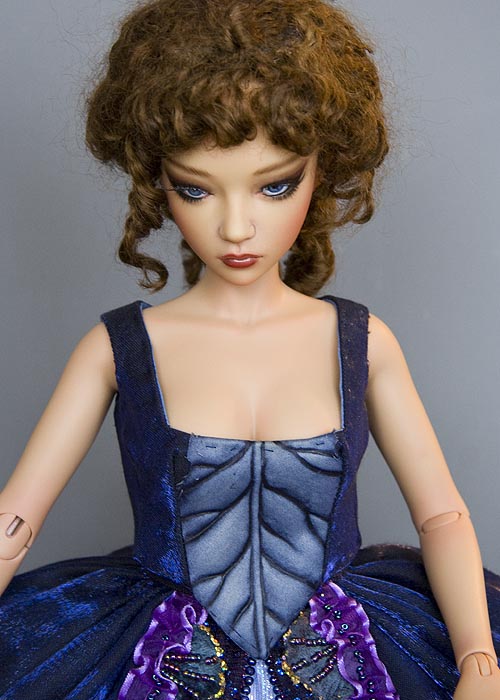
February 10 - I traced the bodice pattern onto iron-on interfacing, pressed it onto the navy taffeta, and cut it out.
I positioned a poinsettia petal in center front, and basted it into place.
I positioned a poinsettia petal in center front, and basted it into place.
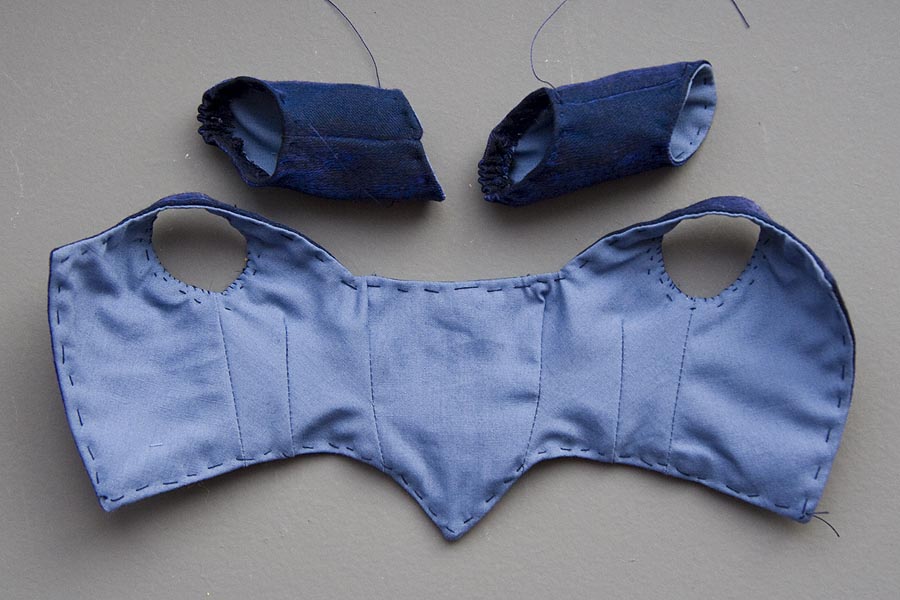
After sewing all the darts and side seams on both the bodice and lining, I pinned them together right sides together. I can
stitch all the way around the outside edge - top, back, and bottom edge - and turn it right-side-out through an armhole.
stitch all the way around the outside edge - top, back, and bottom edge - and turn it right-side-out through an armhole.
After turning the bodice right-side-out, and sewing the sleeves, I basted all the edges so it will press better.
I tried the separate pieces on Asa to see how they look.
I tried the separate pieces on Asa to see how they look.
I've decided the neckline isn't open far enough - it looks far too demure. I'm going to have to remove
the basting, turn the bodice inside-out again, and re-stitch the neckline, making it open a lot further.
February 11 - Yesterday I made the bodice, but then I decided the neckline wasn't open enough. So I had to take out all
the basting and turn the bodice inside out again (through an armhole). I was disappointed at first that I had to go to all
that extra trouble, but in the end it turned out to be a good thing. When I made my test bodice out of a single layer of
cotton, the back overlapped just fine for snaps, but with all the layers and thickness of the real bodice fabrics, the back
seams barely overlap, so the bodice was going to need eyelets and get laced up the back. That will actually look much
better. So when I had the bodice inside out, I also trimmed the seam allowances down on the back edges so it would be
easier to insert eyelets. I was also able to solve the problem of how to attach the sleeves neatly. When I had the bodice
inside-out again, I clipped the armholes, and basted both the lining and taffeta armhole openings separately. Then when
the bodice was back with the good side out, I stitched the lining to the bodice fabric around the sleeve openings.
I basted back the seams at the top of the sleeves and pressed them while inserting the wooden handle of a spatula...
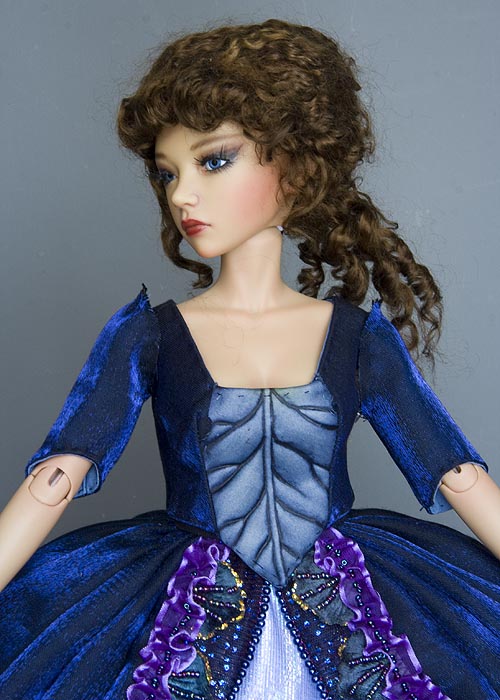
The bodice looked much better with the new adjustments, so it was definitely worth the extra effort.
Like, why bother switching Asa to a glamour bust if her cleavage isn't even going to show?
Like, why bother switching Asa to a glamour bust if her cleavage isn't even going to show?
|
|
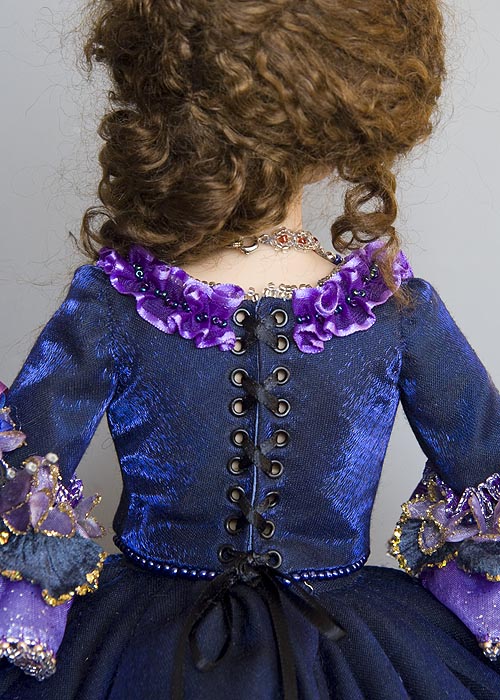
I inserted all the eyelets along the back, beaded the bottom edge of the bodice, and the neckline,
then touched up the front flower petal with paint and glitter. Also touched up the last five petals.
then touched up the front flower petal with paint and glitter. Also touched up the last five petals.
Next are the sleeve ruffles. I've beaded the sparkly purple ribbon ruffle edges and still need to sew the light blue ruffles
which are of the same fabric as the front of the underskirt. I'm going to sew all the trims and embellishments onto each
sleeve before I stitch the sleeve into the armhole. And then I'll finish the bodice neckline.
which are of the same fabric as the front of the underskirt. I'm going to sew all the trims and embellishments onto each
sleeve before I stitch the sleeve into the armhole. And then I'll finish the bodice neckline.
February 13 - When I looked closely at the sleeves I thought maybe I'd made them too short. I had made a curve at
the bottom of the sleeves so they'd be higher in front, and lower in back, but thought they didn't come down far enough.
the bottom of the sleeves so they'd be higher in front, and lower in back, but thought they didn't come down far enough.
So I reworked my sleeve pattern, inserting a half inch. Then I cut it out of the fabric. But, when I was measuring the length of the light blue ruffle, I changed my mind, and decided the sleeves were the proper length after-all. I thought the light blue ruffle seemed too plain, so picot-stitched periwinkle blue beads along the entire bottom edge. The beading makes my eyes go wonky, so I stitched both ruffles on the first sleeve, then took a picture since it was getting late in the day, and I was losing the light.
|
|
After I finish the beading on the second light blue ruffle, I'll sew the ruffles on the second sleeve. Don't know if I'll
get to the elbow embellishments this evening, as I'm very tired today. But after all, "tomorrow is another day".
get to the elbow embellishments this evening, as I'm very tired today. But after all, "tomorrow is another day".
February 14 - Today things are going a lot better today. The end is coming into sight, so I'm getting excited to finally see everything come together. I sewed the ruffles on both sleeves, and sewed on the petal trim. I used the glue gun to glue on the roses and ribbons. I usually prefer sewing to gluing, but with all the bits of embellishments sticking out and catching the thread at every stitch, I opted for the glue gun. After the sleeves were done, I sewed them into the bodice armholes.
|

|
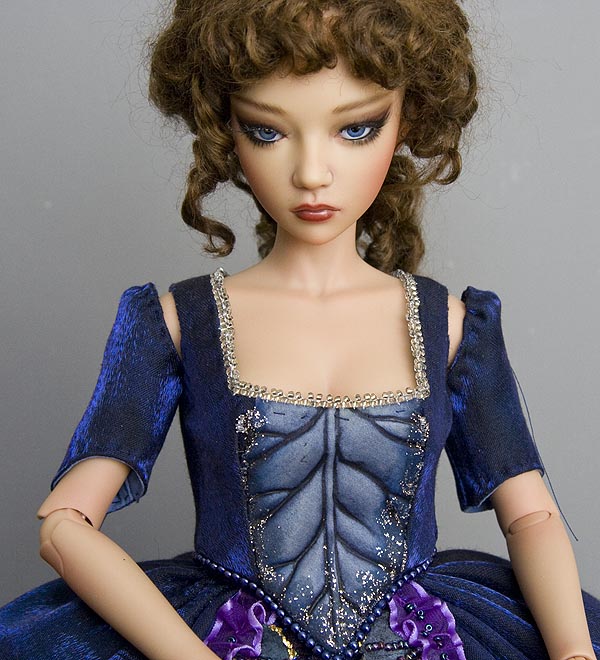
Next step was to sew the upper bodice puffs from the sparkly purple ribbon, and bead both edges.
I gathered and beaded the purple ribbon along the neckline and stitched the ribbon puffs in front.
Finished with a blue paper rose. With the bodice finished, I was finally able to lace it up the back.
I gathered and beaded the purple ribbon along the neckline and stitched the ribbon puffs in front.
Finished with a blue paper rose. With the bodice finished, I was finally able to lace it up the back.
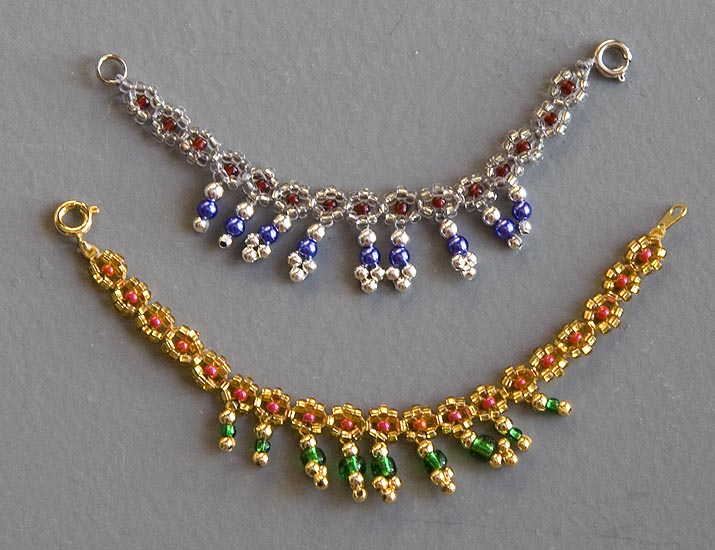
I've been keeping an eye out for just the right necklace, but haven't found one yet, so decided to make one for the time being. I borrowed my Ryung's necklace as a model, and chose clear, silver, blue and red beads, and made the necklace.
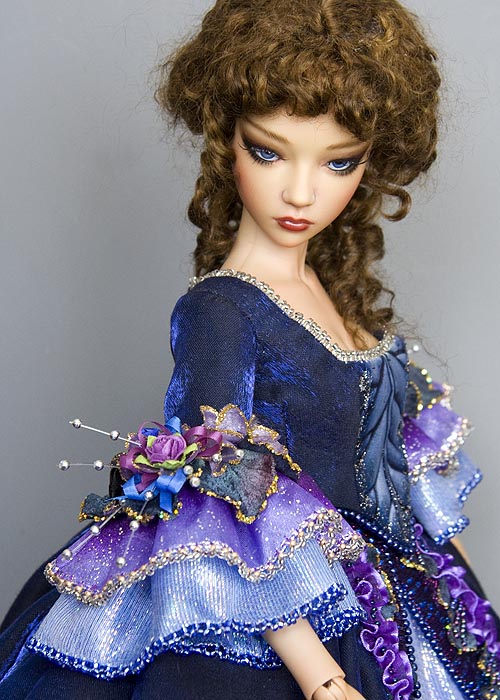
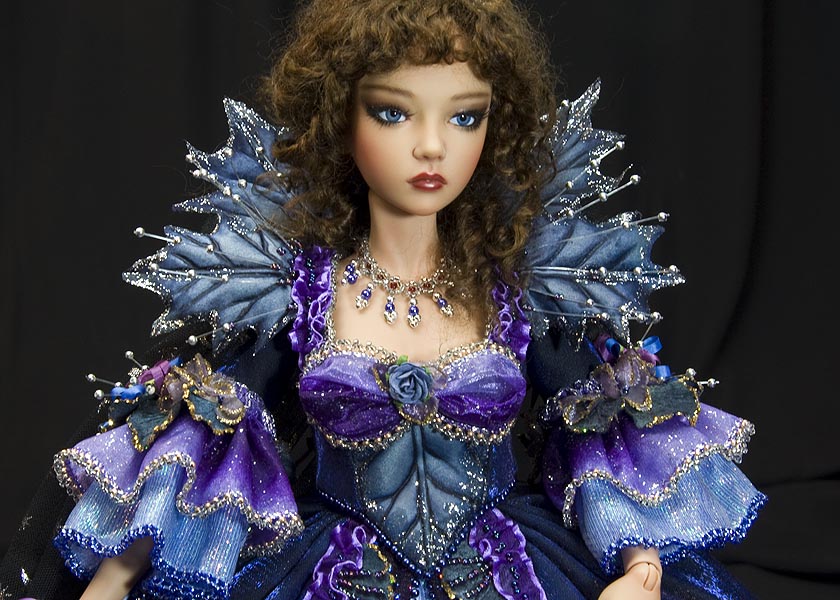
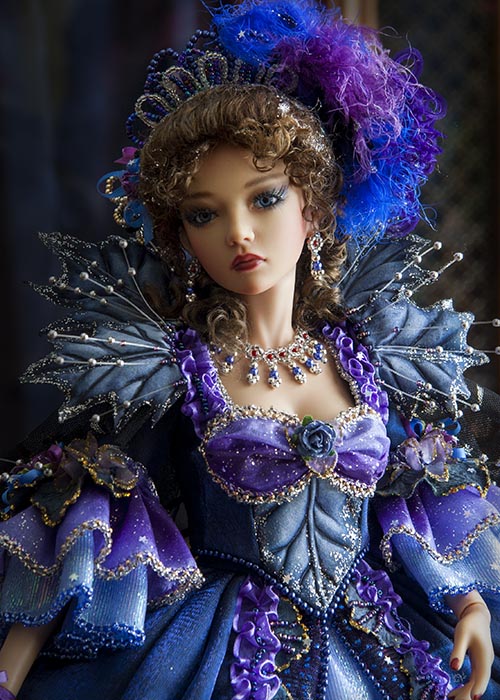
The finished bodice and necklace....
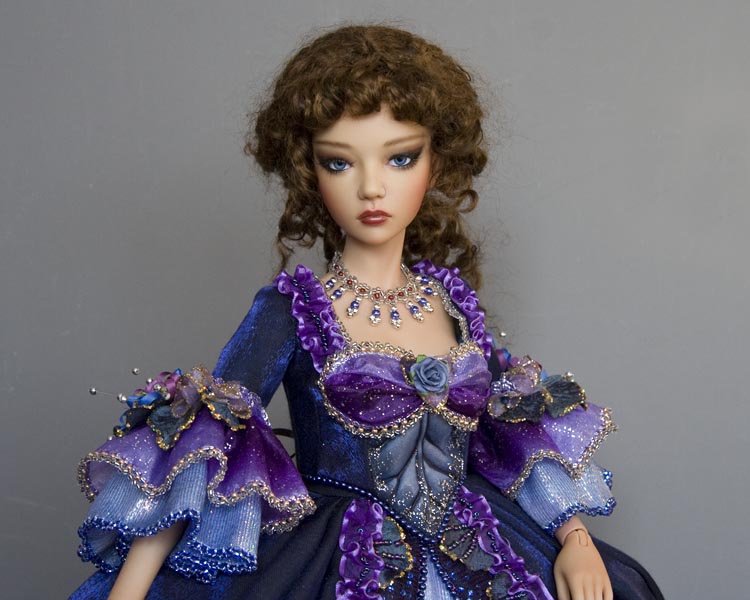
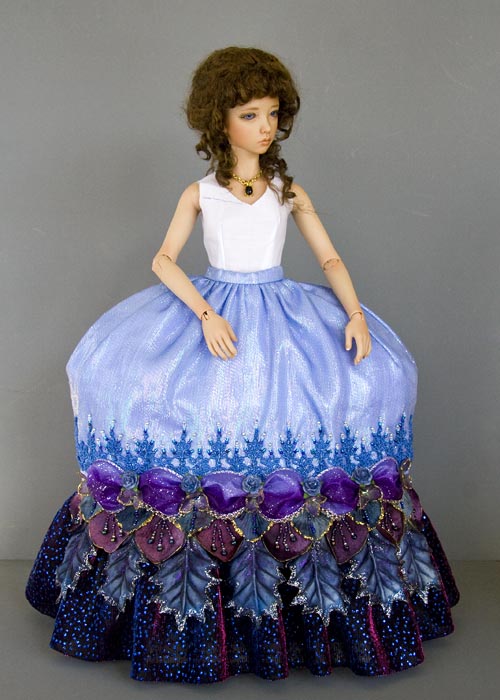
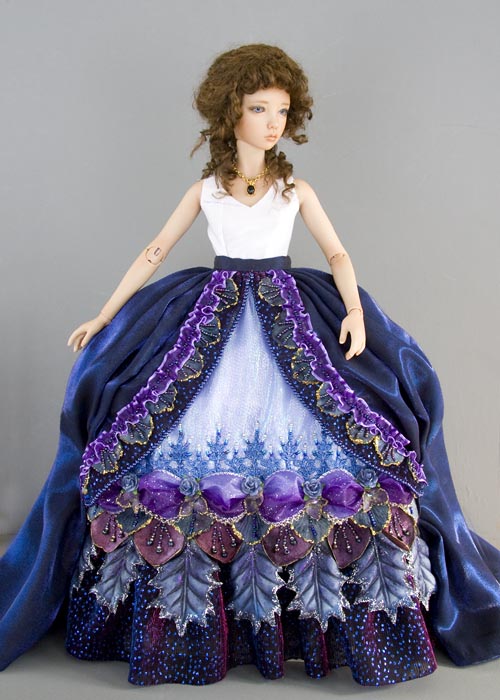
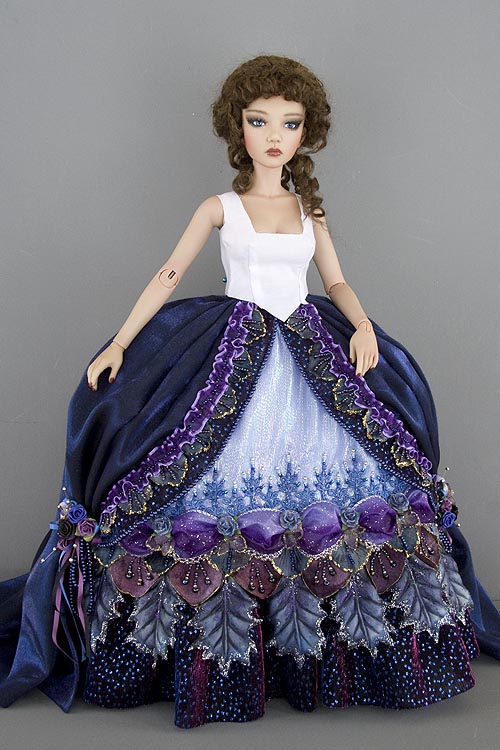
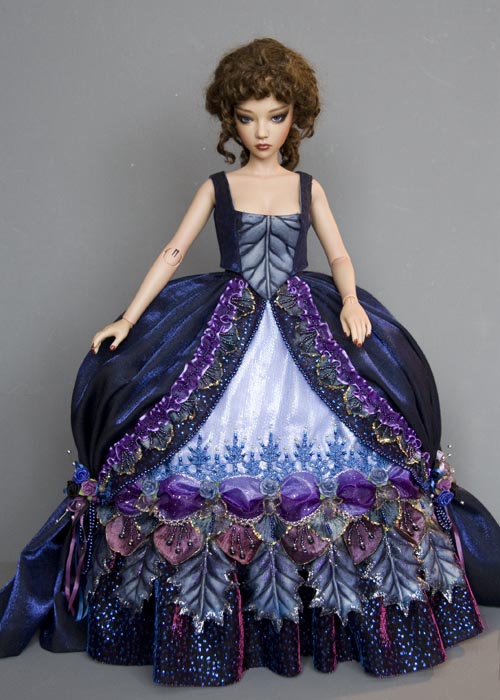
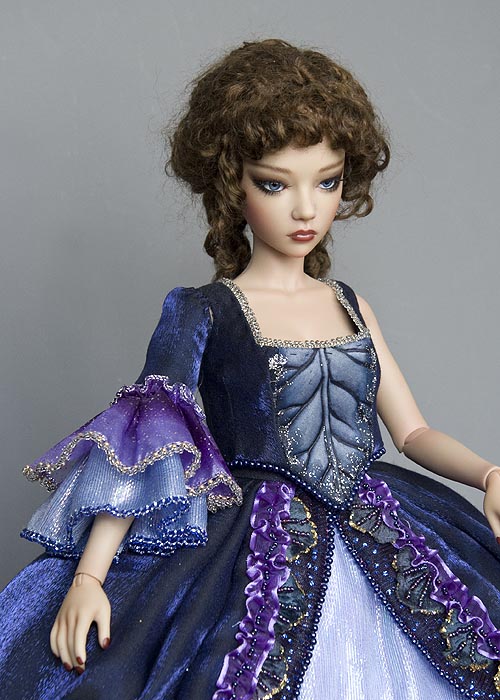
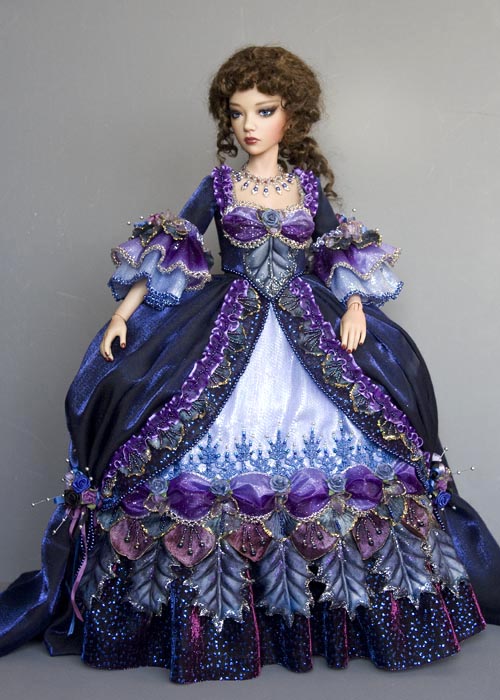
...and the whole dress....
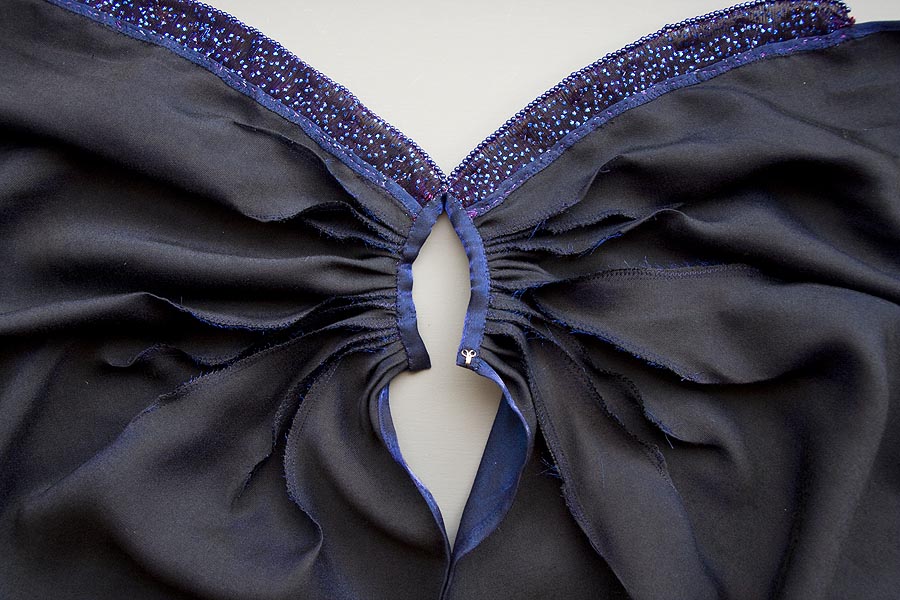
Next step is to make the sheer tulle cloak that's covered with stars and moons, and has the
stand-up collar with the last five poinsettia petals. Then I have to make a wig.
stand-up collar with the last five poinsettia petals. Then I have to make a wig.
February 16 - I've finished Asa's cloak, so now her gown is almost done! Yay! I did most of the cloak last night when lighting wasn't good for photos, so didn't take any under construction photos. It was very fiddly work. Here's the finished cloak....I think the undersides of the petal collar could use some glitter....
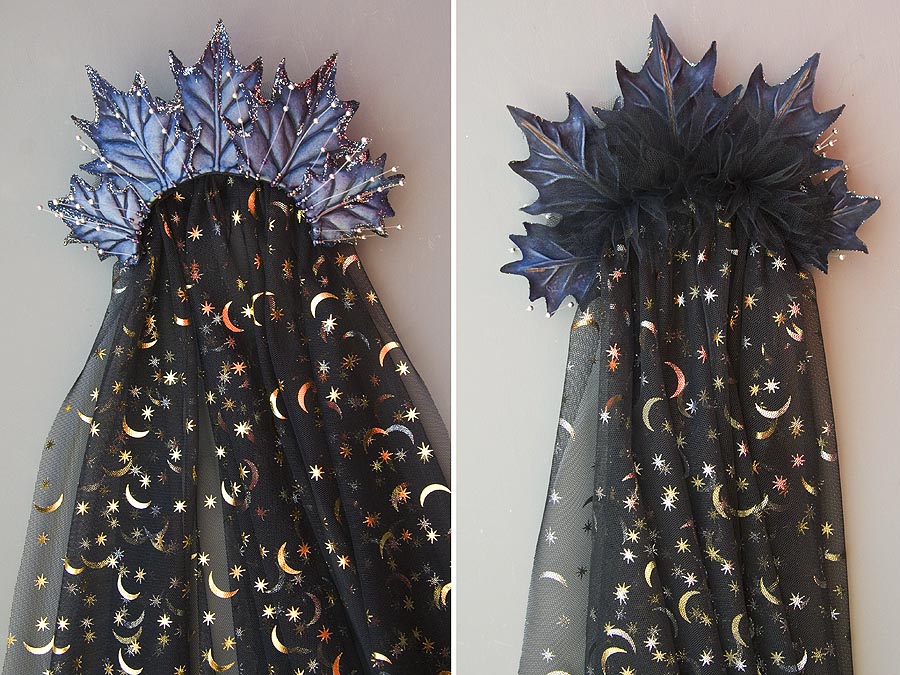
The cloak is made of a soft black tulle covered with stars and moons. They are gold on one side, and silver on the other, but when the fabric lies gathered in folds, both the gold and silver show.
I sewed small black snaps under the front edge of the cloak and on the bodice front under the purple ruffle. I chose black snaps so they would blend into the dress, and chose two snaps that fit really tightly together. After all they were going to have to hold the whole cloak in place. I like that it's separate, so the outfit can be worn with or without it. I had to take some studio shots....
I sewed small black snaps under the front edge of the cloak and on the bodice front under the purple ruffle. I chose black snaps so they would blend into the dress, and chose two snaps that fit really tightly together. After all they were going to have to hold the whole cloak in place. I like that it's separate, so the outfit can be worn with or without it. I had to take some studio shots....
Now I need to make the wig. I had originally thought it should be silver-gray, like the original, but I like the dark brown of the wig she's been wearing. I find it has a softer look than a gray, white or black formal wig would have, and the brown compliments the maroon and gold embellishments on the dress. I've gone through my bags of brown mohair and there's lots the same colour as the wig she currently has on. I've crocheted a wig cap, but don't want to tackle the mohair today, as it's always a huge mess, and we are getting overnight company, and don't want to have to stop halfway through. I'll just work on the hair embellishments, and maybe tackle the wig tomorrow.
the Wig
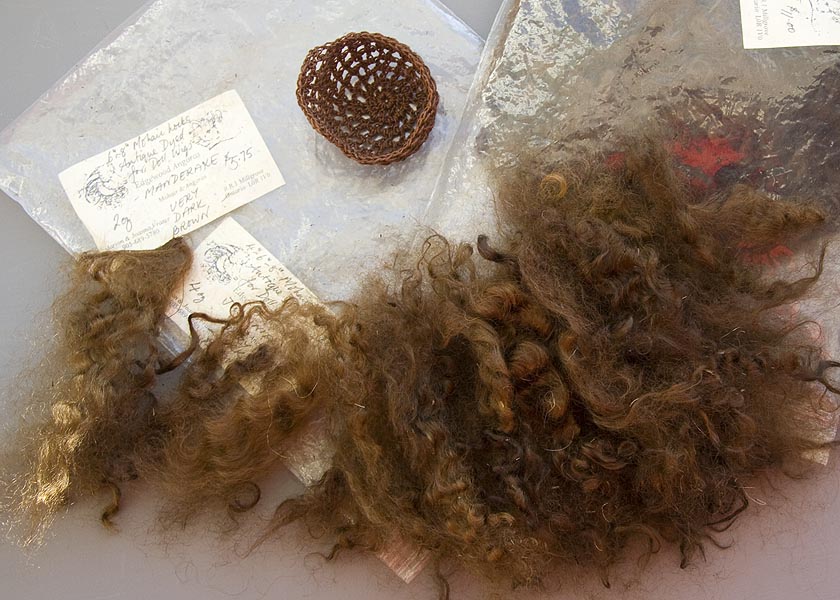
February 17 - Today I have to tackle Asa's new wig. I've crocheted the cap, and have started sorting through the mohair. I found two bags of 'Very Dark Brown' which were purchased from Edgewood Angoras many, many years ago. Back then Edgewood Angoras raised angora goats specially for doll hair, which they sold at local doll shows. The mohair was dyed and sold in baggies marked with the name of the goat the mohair came from. They had a lot of goats, and some had way curlier hair than others. The mohair I'm working with today comes from 'Justinia' and 'Mandrake'. The mohair locks range from 5" to 8" long and are quite curly.
I bought a lot of Edgewood Angora's last stock before they went out of business, and much of that last mohair was quite matted and full of debris, so it's going to need a lot of combing.....
I bought a lot of Edgewood Angora's last stock before they went out of business, and much of that last mohair was quite matted and full of debris, so it's going to need a lot of combing.....
I'm going to have to strip Asa down to her underwear - or less - as I certainly don't want her gown covered with mohair and bits of plant debris as I work on her wig.
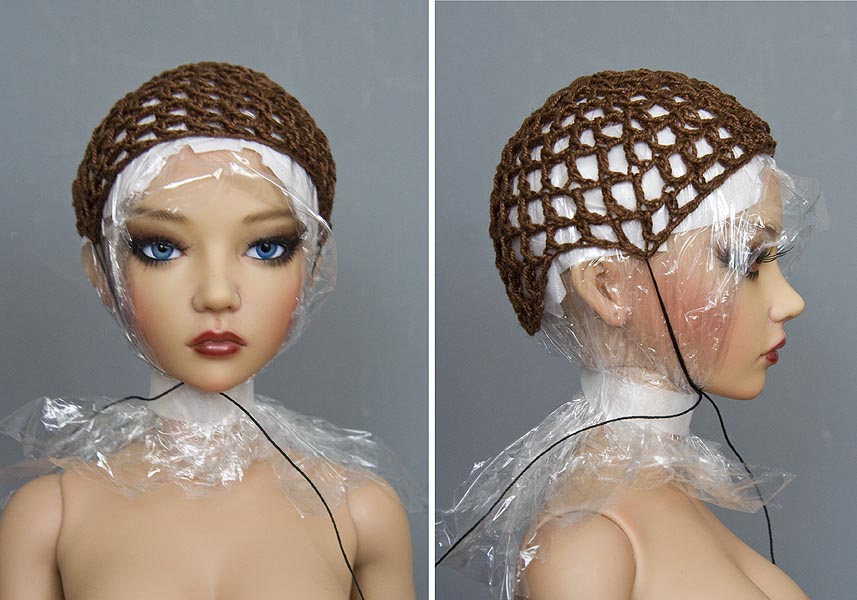
February 18 - Asa is all stripped down for the making of her wig. I put a layer of plastic wrap on her head, then a layer of Kleenex, then another layer of plastic wrap, and secured it with tape around her neck. Little loops of tape hold the crocheted wig cap onto the plastic wrap. I stitched a thread from both sides of the head, in front of the ear, to shape the cap......
February 18 - Asa is all stripped down for the making of her wig. I put a layer of plastic wrap on her head, then a layer of Kleenex, then another layer of plastic wrap, and secured it with tape around her neck. Little loops of tape hold the crocheted wig cap onto the plastic wrap. I stitched a thread from both sides of the head, in front of the ear, to shape the cap......
To make the wefting, I stitched the mohair onto paper, then removed it from the paper. It took a long time to prepare enough mohair, as much of it was very matted and full of plant debris. I ended up covered with al the bits of plants debris and had to vacuum my clothes and the whole areas I was working.
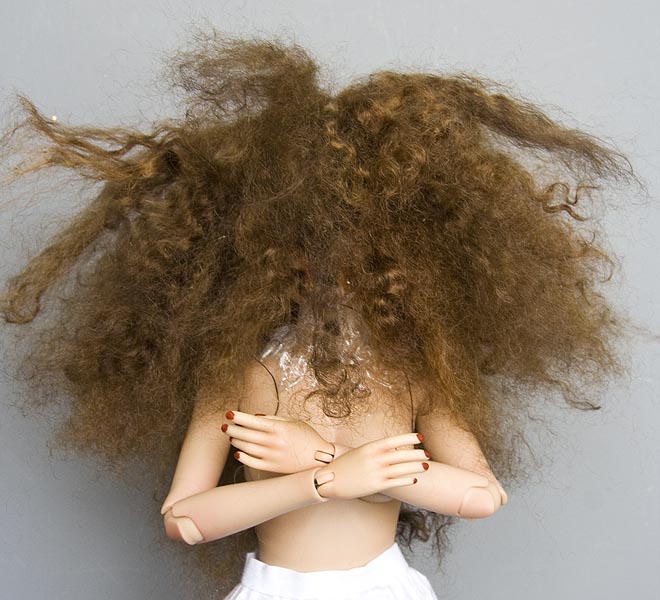
I applied the mohair with my glue gun, first gluing the shorter curls around the front of her face, and the longer hair in the back of her neck. Then the wefting was applied one layer at a time. When I was done gluing, Asa looked like she was lost in a giant afro. But as messy as it may look, I did apply the mohair in very specific layers.
I applied the mohair with my glue gun, first gluing the shorter curls around the front of her face, and the longer hair in the back of her neck. Then the wefting was applied one layer at a time. When I was done gluing, Asa looked like she was lost in a giant afro. But as messy as it may look, I did apply the mohair in very specific layers.
The next step is to remove the wig, soak the hair in lukewarm water and comb it thoroughly.
That will reduce the bulk considerably. Then I have to start styling it.
That will reduce the bulk considerably. Then I have to start styling it.
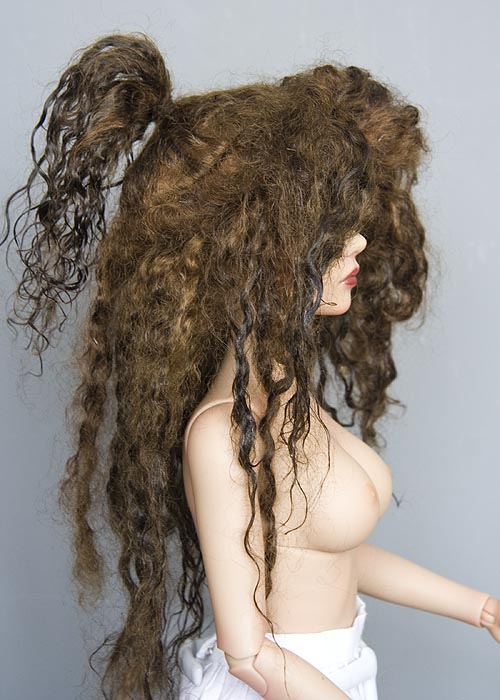
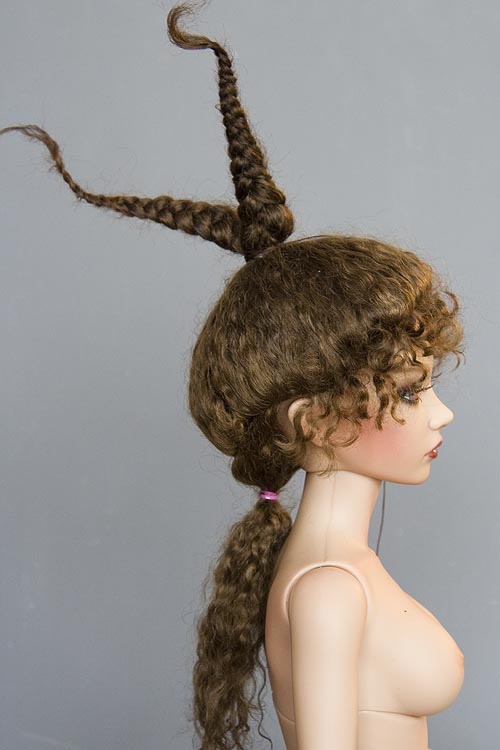
February 20 - Time to tackle the wig. I pulled back the hair so you can see that the mohair has actually been glued
on with a specific hairstyle in mind. It's still extremely poufy, as the mohair has not been combed down yet.
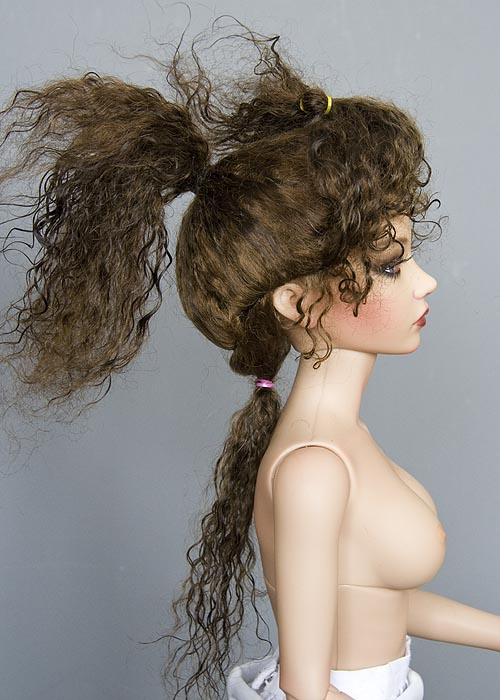
I soaked the wig in lukewarm water, and parted out the front edge row,
combed the center section and tied the hair into a ponytail
combed the center section and tied the hair into a ponytail
I separated out the very front layer of hair and secured it with an elastic for now. I combed out all the other outer hair and tied it back onto the first ponytail. My plan at this point it to thread the top layer of hair at the front through the tiara I'm going to make, and then secure the hair into the ponytail.
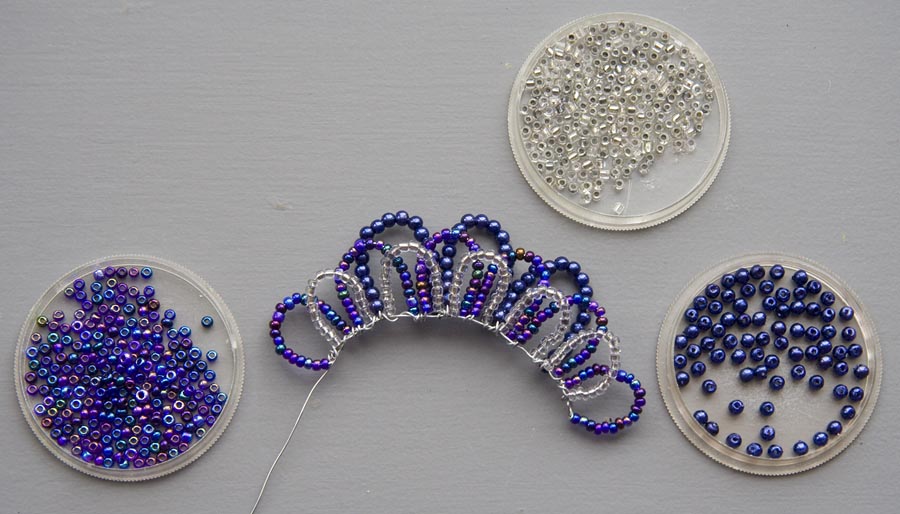
I had tried a "real tiara" with rhinestones on Asa but found it didn't look right at all, so decided to
make my own to better match the gown. I wired three layers of beaded loops to create the tiara.
make my own to better match the gown. I wired three layers of beaded loops to create the tiara.
I chose some nice blue and purple feather fluffs, and wet them, and folded into paper towel, wrapped them onto tiny curlers.
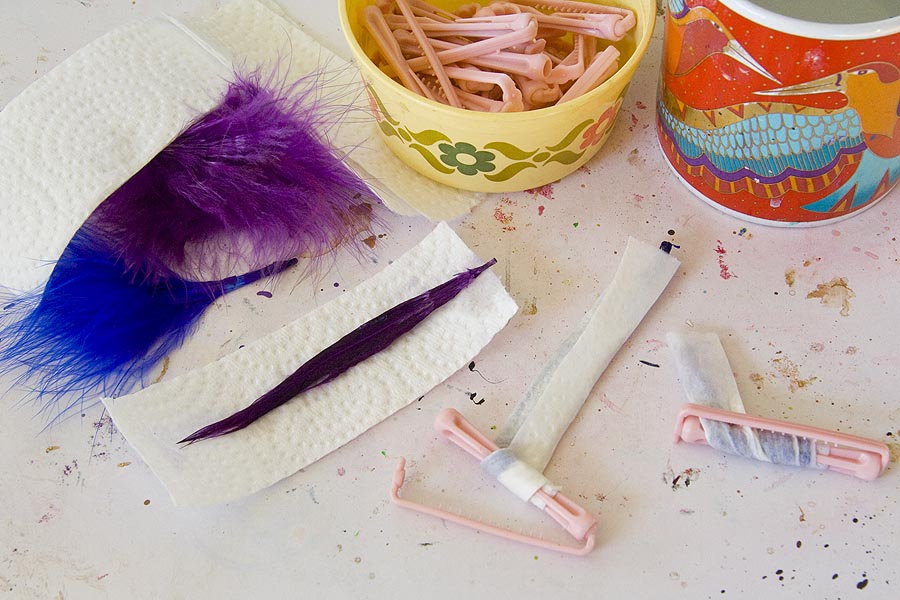
I decided there wasn't enough space on the base of the tiara to pull the hair through, so just combed the remaining front
hair back and secured it into the ponytail. Then combed the ponytail, divided it into two, and braided each section.
hair back and secured it into the ponytail. Then combed the ponytail, divided it into two, and braided each section.
I wrapped the braids around to create a small bun, and stitched it into place. Then I combed the front bangs. I took the wig off the doll, and gave the wig a thorough spray with hairspray. I covered Asa with a large piece of plastic wrap to protect her from the hairspray, and combed out the back hair and put it onto five curlers.
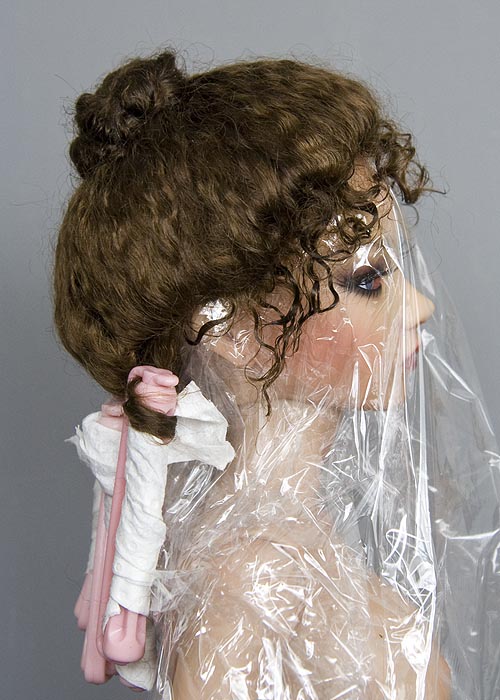
*Note - NEVER use hairspray on an unprotected doll. It will react with the sealer and ruin the faceup. I know this from first-hand experience having accidentally gotten hair spray on my Narae. I was in a hurry, and knew enough to cover her face with a paper towel, but the spray still touched the resin around the edges of the paper towel, and reacted with the sealer causing white spots.
February 21 - I did all the wig-finishing and embellishing last night when there wasn't good lighting, so there are no under-construction photos. After removing the curlers, I sprayed them and let them dry. Then I stitched on the tiara, and hot-glued all the embellishments I'd prepared, into the wig. After everything was glued on, I applied glitter paint and tiny stars.
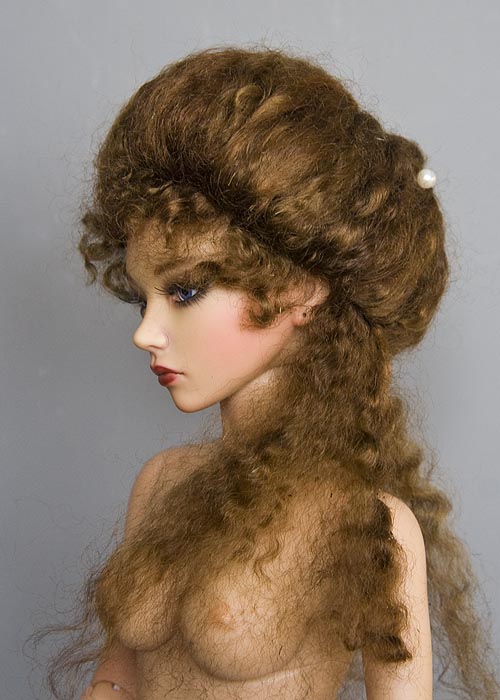
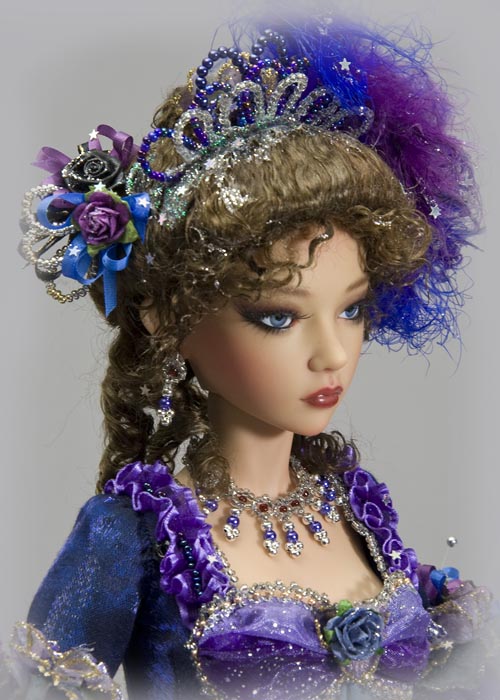
Here's the final hairdo....
|
|
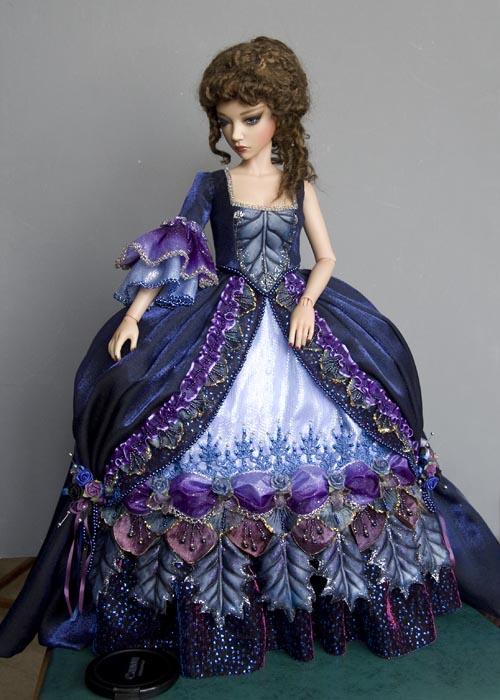
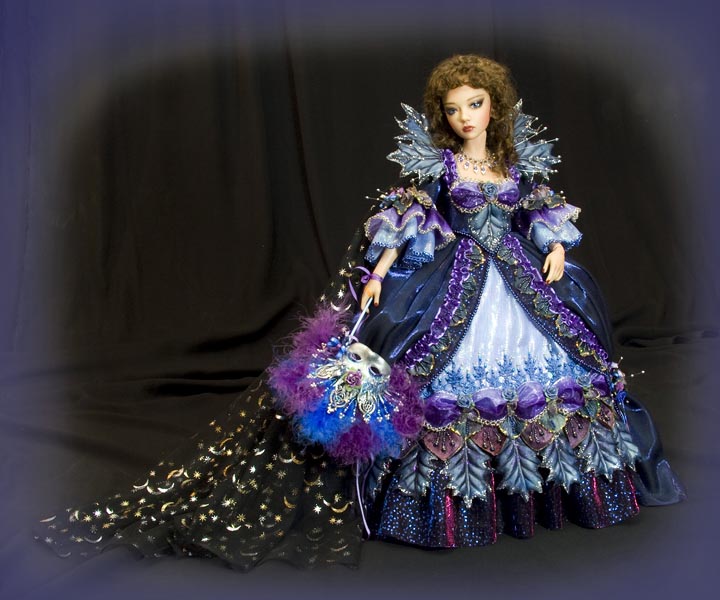
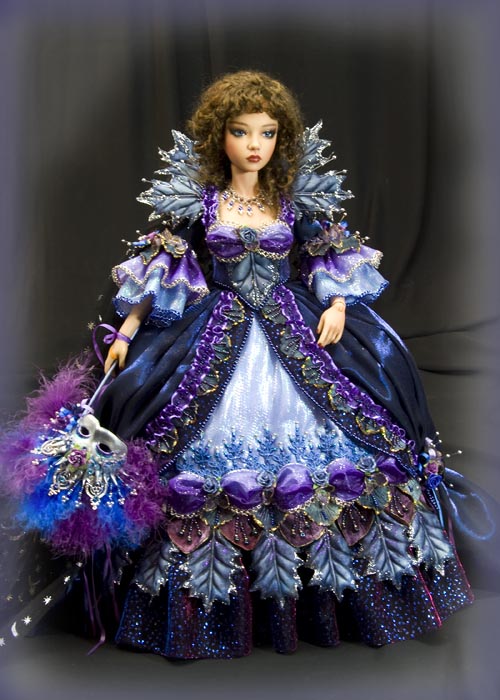
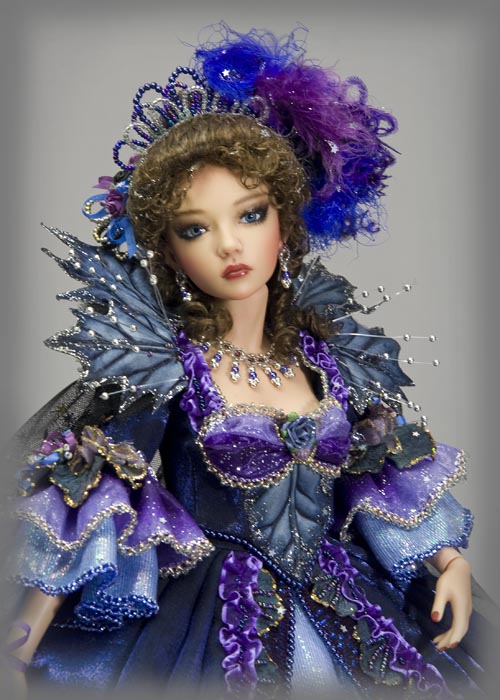
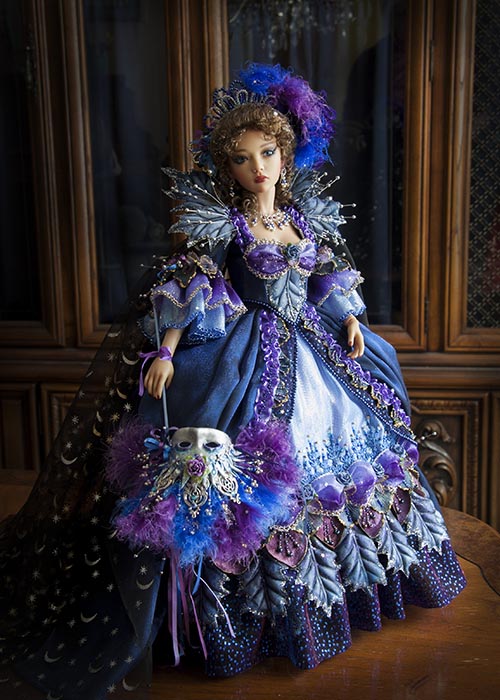
...and a full-length view of the whole ensemble....
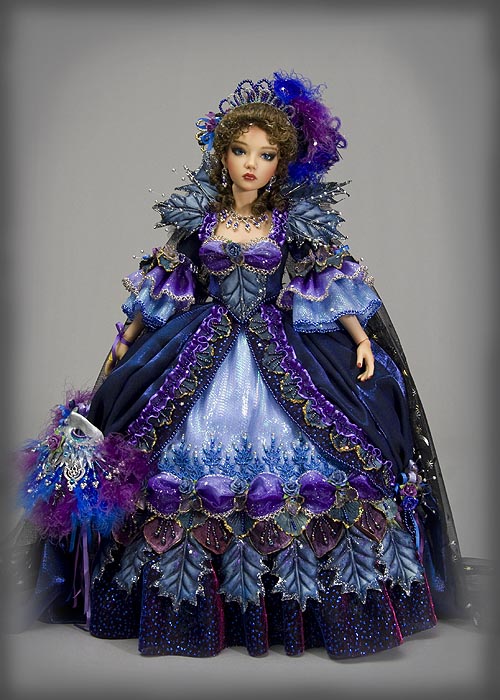

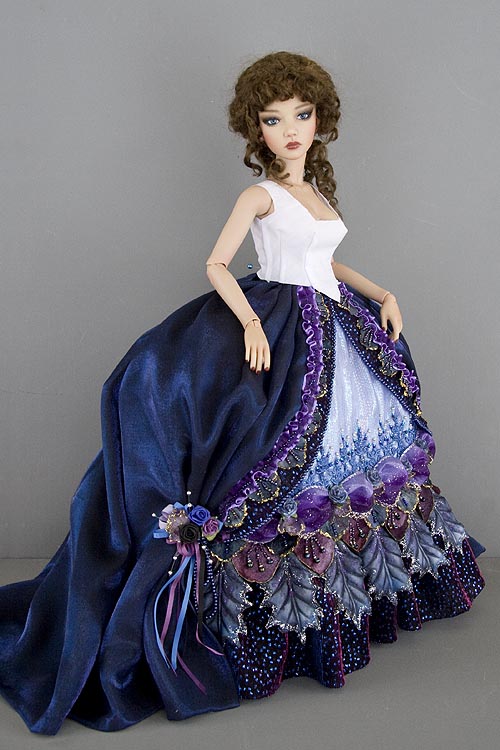
...and some mood photos.....
Copyright © 2014 Martha Boers
All Rights Reserved
All Rights Reserved
(return to main Tutorials page)
Show us what you have made inspired by this Tutorial
Princess Marshmallow, by Mimella
|
